Difference between revisions of "Aluminium Makercoin Trial"
m (Link) |
m (→Manufacture) |
||
| Line 26: | Line 26: | ||
==Manufacture== | ==Manufacture== | ||
I used [[Fusion 360]] to program the toolpath. | I used [[Fusion 360]] to program the toolpath. | ||
| − | + | {{clarify|More to add here}} | |
===Test cuts=== | ===Test cuts=== | ||
I used some laser cutter scrap to cut a wooden coin to test the size. | I used some laser cutter scrap to cut a wooden coin to test the size. | ||
Revision as of 11:32, 6 June 2019
| Aluminium Makercoin | |
|---|---|
 | |
| Primary Contact | Danspencer101 |
| Created | 04/06/2019 |
| Completed | 04/06/2019 |
| Status | Complete |
| Type | Members Project |
| QR code | |
I wanted to have a go at making a maker coin just for fun. The coin has a topographic map of the UK on one side and a 3D scan of my head on the other. Many makercoins that I've seen on YouTube are 3D printed but I wanted to have a go at CNC milling one.
This project is my first foray into flip milling (2 sided milling) so I'm not expecting it to be perfect.
Design
I used a few different programs to put this model together.
The first was Skanect which I used to take a 3D scan of my head. The second is a website called Terrain2Stl which I used to get the depth map of the UK. I also used some software called Meshmixer to tidy both the head scan and the map and scale them to approximately the right dimensions.
The coin itself was put together in Fusion 360. I was able to design the main coin body and then import & place the STL files in the required positions
Manufacture
I used Fusion 360 to program the toolpath. [clarify]
Test cuts
I used some laser cutter scrap to cut a wooden coin to test the size.
| Please improve this page by adding a photo. Click to upload an image, help with using images can be found here. The talk page may contain suggestions about suitable images. |
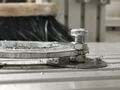
Cutting the real thing

Cutting one side
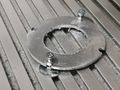
How the workpiece was clamped
'Clamping post' arrangement
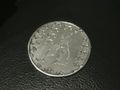
Map Side
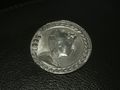
Head Side


