BMO
Revision as of 11:49, 5 February 2019 by Danspencer101 (talk | contribs) (Danspencer101 moved page Project:BMO to BMO over redirect)
| BMO | |
|---|---|
 | |
| Primary Contact | Michael Erskine |
| Created | 30/04/2013 |
| Status | In Progress |
| Type | Members Project |
| QR code | |
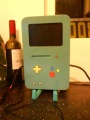
A little buddy who wants to play video games.
See http://adventuretime.wikia.com/wiki/BMO
This is another "Near Zero Cost" project so I'm just using what comes to hand or what I already have lying around.
Work In Progress Gallery
<<TODO pull in twitpic images, ow.ly images etc.>>
All acrylic buttons (hand carved!)
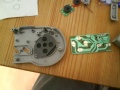
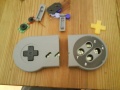
Sawn fake SNES controller
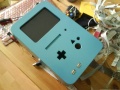
Painted with Plasti-Kote


Scale and geometry
The geometry is very important! This has to be a "Real-Life" character.
Scale to fit small CCTV PAL monitor for face
Do many prototypes: -
- BMO dimensions in paper
- BMO body in card
- BMO body in construction plastic
- BMO laser cut acrylic?
Revisions to date
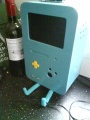
BMO Mark One: a simple foam space model to get screen location and general geometry decided.
BMO Mark Two: a heat-formed plastic body with permanent screen mounting.
Accuracy
What colour is BMO?
- google images search for BMO: http://www.google.co.uk/search?safe=active&q=bmo&tbm=isch
- essentially teal == #008080
- GIMP eyedropper tool sample colours
- is there a matching laser acrylic colour?
- BMO Mk II is painted with Plastikote teal
BMO Lettering
- thanks to Dominic I have some vinyl cut BMO lettering stickers for the sides
Raspberry Pi
- Rather annoyingly I burnt out a Pi when connecting the wrong power supply - I connected the monitor's 12v supply instead of the hub's 5v supply. Same connectors! NEVER DO THIS AGAIN!
- Now using my "Vanity Pi" (the one in the neon green PiBow case)
Powered USB Hub
- to support the current pulled by the various USB peripherals, especially the WiFi
- hub ideas are thanks to Spencer for his work on his rasbmc smart car project
USB WiFi adapter
- EDUP model from DealExtreme
- Tiny!
- works well right now but only one SSID is currently set up - OK at HackSpace as there are plenty of wired LAN points
- http://www.geeked.info/raspberry-pi-add-multiple-wifi-access-points/
- wicd has a GUI and curses interface for exactly this - try it out
Speaker holes
7x pillar drill 6mm - backed with black cloth
Arms and Legs
- Electrical solid 3-core cable
- poseable
- doubled up for legs (but not feet)
- 3 cores become fingers of hand
- tee shirt material socks
- Arms and fingers with a Sugru coating - I made this into an instructable http://www.instructables.com/id/Sugru-blended-for-the-skin-of-BMOs-arms/
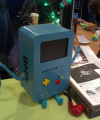
Floppy/Cart slot
- Dimensions not fully decided
- GameBoy cart slot size?
- The original Game Boy and the Game Boy Pocket share the same cartridge type, measuring about 55mm wide by 60mm high and 7mm thick. The casing is opaque plastic, usually grey or yellow. These cartridges can be played in all consoles except the Game Boy Micro.
- make functional?
VHS tape slot
- sprung flap just like a real front-loading VHS
- access to back panel opening mech or actual port for something?
- "it goes in my butt"
Front USB ports
- keyboard
- mouse
- game controllers
- forwarded to internal USB hub
Power Options
- Initially BMO is powered by 2 wall-warts: -
- 12v for the LCD screen
- 5v, 2A for the powered USB hub and Pi
- I already fried a Pi by connecting the wrong power supply - live and learn!
- I want to have battery power with a single mains input and battery charging circuit
- a lot to ask perhaps?
- LiPo options? Ask some experts at the HackSpace
- one of my little dollar switching regulators might be OK for powering the Pi from the 12v supply thus simplifying the power in the early days - careful testing to be done
Game Controller
- the 3 buttons are hand crafted from acrylic (laser cutter is down!) and backed with simple tactile buttons on stripboard. Getting these acurately mounted was a huge task: I think a custom PCB would have been quicker!
- the d-pad is from a fake SNES controller I got off ebay for £2.50. I just sawed it in half (no, seriously!) and wired the direction traces directly to the Minimus
- Using a Minumus USB v1 (see Minimus AVR Board) for a standard USB HID Joystick interface (rather than ATMega328P hanging off the Pi or using GPIO bit-bashing)
- The LUFA joystick demo patched by Jamie Lentin (http://jamie.lentin.co.uk/embedded/minimus/) was easily altered for my 3-button + 4-way D-pad BMO controller. Simply built from the shell and uploaded using "make dfu". Works well on Debian but has issues on Windows XP, 7 & 8 (known problem and now reportedly fixed in a more recent LUFA build).
- So now BMO can be used as a USB game controller under Linux!
- TODO: still need to make it 8-way and update the firmware to make it work on Windows
Software
- Initially I started playing with the Perl Tk Canvas widget because it can be thrown together but I wanted to add decent audio clips and joystick input
- Now using SDL::Perl (http://sdl.perl.org/) and the audio and joystick are a breeze. Animating splines may not be as easy as it is in Tk Canvas!
- The main menu idles as an animated BMO face - options pop up upon any button press
- Using bits and pieces from http://opengameart.org/
BMO Face
- solid colour background
- selection of eye and mouth animations
- bored mode
- cute mode
- shocked mode
- glee mode
- cross mode
- audio