Cast Polyurethane Freestyle Skateboard Bushings
| Cast Polyurethane Freestyle Skateboard Bushings | |
|---|---|
| Primary Contact | Michael Erskine |
| Created | 24/02/2016 |
| QR code | |
Overview
Freestyle skateboarding requires very exact equipment and the choices for truck setup can be particularly exacting. The current favourite off-the-shelf setup is to use Khiro Purple barrel bushings with a conical top and a suitably wide hanger-side washer to prevent "splurge". This setup can be expensive and not so easy to obtain. As part of my ongoing investigations into DIY skateboard equipment and equipment modifications I have developed a prototype truck bushing of the classic stepped Tracker Stimulator shape (design available more recently as Venom Eliminators or Bear Jimz Stepped).
Polyurethane
Two part casting polyurethane is easy to get hold of in small quantities (at a premium price!) but not so easy to find with such exact properties. My thoughts are that if I find a suitable formula then I can buy in bulk to reduce costs.
First Casting Test
Using a two part 72(+/-2) Shore D mix of casting polyurethane in a PVC pipe and laser-cut MDF mould.
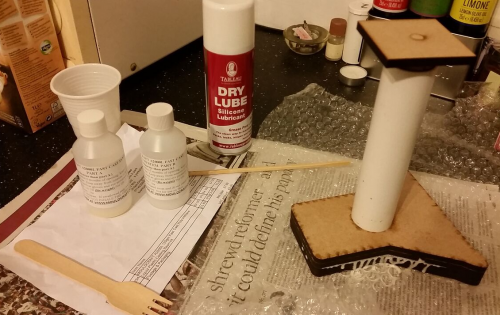
Casting setup

The mould leaked somewhat initially as the long pot-life mix was very thin. Adding weights to the base stopped leakage.
Despite using a silicone spray as mould release, the casting had to be cut from the PVC pipe and the dowel was similarly fixed in place.
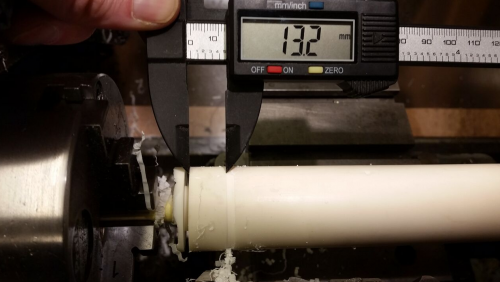
The finished slug was then mounted on the lathe and a pair of test bushings was cut to size to fit a pair of Independent 109 freestyle trucks.
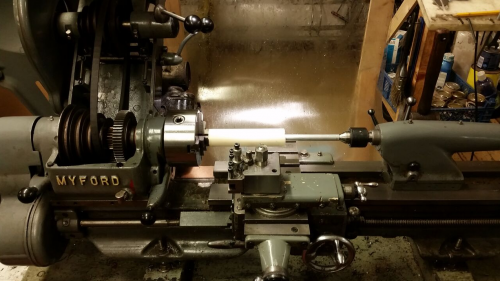
Mounted on lathe with live centre
Parting tool used to face and surface


From the apparent hardness I was expecting the PU to be crumbly and break in chunks on the lathe but it cut very creating lots of paper-like swarf from the parting cutter.
The bushings are super stable upon initial tests.
The Future
- Testing, testing, testing. Always testing!
- reusable mould designs for bulk production that minimise the amount of finishing required (ideally none!)
- shapes for: -
- Independent 109 Trucks: -
- Tracker Racetrack X/S Trucks: -
OK, it's now the future
Some time passes and I'm back on the moulding project. I have come across some interesting techniques for making inexpensive silicone moulds using silicone sealant and cornflour - aka oogoo - and using various additives to make it more pourable or workable.
It's all in the testing so tonight's recipe is using the ratios discussed in the comments of the following instructable: https://www.instructables.com/id/Using-Silicone-Caulking-to-Make-Molds/
"2 parts cornstarch, 2 parts silicone caulk, and one part mineral spirits"
I'll be adding glycerin and acrylic paint "1oz caulk : 3 drops glycerin"
Some good experiments here: https://www.myheap.com/casting-molding/my-heap-mold-book/chapter-8-silicone-caulk-molds.html
Ideally I'd like to dive in and make a perfectly usable mould with this first batch! We'll see how reasonable that is tonight!
I'll take an existing nicely-shaped bushing and construct a 2-part mould in a box. For creating the negative I'll need spacers to hold the bushing above the bottom of the box that I hope will provide fill holes the box will provide alignment for the cut halves and perhaps a cutting line.