Difference between revisions of "Fox Bandsaw"
m (→Usage) |
m (→Issues) |
||
| Line 70: | Line 70: | ||
Cleaning the raising mechanism required the top wheel to be removed and major, awkward dismantling, so it is recommended that a major cleaning service is carried out whenever the blade is replaced. | Cleaning the raising mechanism required the top wheel to be removed and major, awkward dismantling, so it is recommended that a major cleaning service is carried out whenever the blade is replaced. | ||
| + | |||
| + | January 2015 - blade jammed and motor wouldn't turn. Examination showed one of the lower guide bearings has shed its shield cover and two other bearings were seized. replacement bought and fitted. | ||
| + | |||
| + | == Guide Fitting and Adjustment == | ||
| + | |||
| + | For maintainers. The upper guide is secured using two self-tapping screws into an aluminium extrusion - check for looseness here (long-term will probably fail completely). | ||
| + | |||
| + | The upper guide can be removed most easily by undoing the grub screw further than just loosening, so that the guide rotates down on its post, when it can be removed. | ||
| + | |||
| + | The lower guide is best adjusted by popping out the plastic table-infill and using a LED lamp from below, getting a good view from above and using hands / tools below the table. The fixed metal plate guard / guide rubs the right-hand side of the blade - this will need fixing to avoid long-term damage. Note that the fixings for this are in rectangular holes to allow fore-aft adjustment (not apparent if adjustment attempted from below the table). | ||
| + | |||
| + | Major adjustments may be needed after a jam or breakdown. If this happens it is best to remove all the guides, and start from checking the blade tracking (it runs <i>forward</i> on the top wheel and <i>rearward</i> on the lower one) and smooth operation before the guides are fitted. Then, at each stage noise / rubbing can be detected and corrected. | ||
== History / Discussion / Pledge Drive == | == History / Discussion / Pledge Drive == | ||
Revision as of 10:44, 13 February 2015
The Pledge Drive is still running - ad-hoc donations towards additional blades, and accessories are always welcome!
In the dusty area of the workshop, for wood cutting
Specification
- Model: Fox 2560mm two-speed bandsaw
- Motor: 1500W-240V (2hp)
- Blade Length: 2560mm
- Blade Width Capacity: 6 - 35mm
- Blade Speeds: 400 & 850m / min
- Max Cutting Capacity (Throat Depth): 344mm
- Max Cutting Height: 230mm
- Table Height: 995mm
- Table size: 548x 400mm
- Table Tilt Range: 0°- 45°
Safety
You should wear eye protection when using this tool.
Keep fingers, hair, loose clothing away from the blade / cutting area.
Know the limitations of the machine and the blade currently fitted.
Usage
The scales on the front edge of the table don't appear to line up with the blade. They are not supposed to, they correspond to the two positions that the aluminium fence can be fitted.
After use, use a vacuum cleaner to remove dust from the machine and its surroundings and also from inside the lower compartment.
The upper blade guard / support should be adjusted so that it sits just above the material to be cut, maximising the stability of the blade.


The guard is locked in place with the rhomboid-nut, and when this is loosened, the guard can be adjusted up and down with the handwheel using a spanner on the nuts locked on the adjustment shaft. A replacement handwheel will be found and fitted to replace the broken original.
After use, the guard should be left unsecured at its lowest position - this will encourage proper setting every time the saw is used which reduces the risk of blade breakage.

The fence has two positions for the guide edge - one for thin, and one for thick material.
Switching between these requires the two locking nuts to be loosened only - not removed - as there is a metal strip which holds everything in place while the guide is re-fitted as shown here:
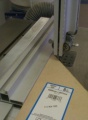
fence for thin material
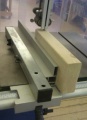
fence for thicker material
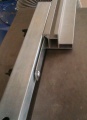
fence fixing strip


Blades
The installed blade (06:42, 16 February 2014 (EST)) is 3/4" wide, 4 teeth per inch, for general-purpose wood cutting.
The blade should have three teeth in the material being cut at all times. So a 4tpi blade works with a minimum material thickness of 3/4". Cutting material thinner than this limit may result in rough, splintered results.
Conversely, a 10tpi blade won't cut thick material well, as sawdust will be trapped in the gullets for longer, resulting in overheating, shortening the life of the blade and risk scorching the material.
Issues
After being in use for a couple of months, it became apparent that cuts were way off-square in relation to the fence - often 'wandering' from the very start of the cut. The plastic table-filler was also badly cut to one side of the slot. One possible reason was a poor-quality blade as supplied, but we dismantled the saw guides and found that the lower one had been assembled (supplied) incorrectly fitted, and this was causing a bias to one side. Re-fitting the guides top and bottom was tricky (poor design) and some metal needed to be removed from the aluminium top-guide support to allow a more reasonable range of adjustment.
Next day, the blade broke!
A replacement blade (and spare) was bought from a [www.bandsawblades-direct.co.uk local supplier] and the original blade turns out to have been made from too thin material for the kind of work expected. The new blade has been fitted, the guides adjusted, and all now seems to be well.
June 2014. The blade broke! This may have been the result of cutting too-thin MDF with the upper guide too high. This had been stiff-to-adjust for a while, and when the blade was replaced, could not be moved down. This is caused by dust accumulating in the raising mechanism, jamming the rack-and-pinion.
Cleaning the raising mechanism required the top wheel to be removed and major, awkward dismantling, so it is recommended that a major cleaning service is carried out whenever the blade is replaced.
January 2015 - blade jammed and motor wouldn't turn. Examination showed one of the lower guide bearings has shed its shield cover and two other bearings were seized. replacement bought and fitted.
Guide Fitting and Adjustment
For maintainers. The upper guide is secured using two self-tapping screws into an aluminium extrusion - check for looseness here (long-term will probably fail completely).
The upper guide can be removed most easily by undoing the grub screw further than just loosening, so that the guide rotates down on its post, when it can be removed.
The lower guide is best adjusted by popping out the plastic table-infill and using a LED lamp from below, getting a good view from above and using hands / tools below the table. The fixed metal plate guard / guide rubs the right-hand side of the blade - this will need fixing to avoid long-term damage. Note that the fixings for this are in rectangular holes to allow fore-aft adjustment (not apparent if adjustment attempted from below the table).
Major adjustments may be needed after a jam or breakdown. If this happens it is best to remove all the guides, and start from checking the blade tracking (it runs forward on the top wheel and rearward on the lower one) and smooth operation before the guides are fitted. Then, at each stage noise / rubbing can be detected and corrected.
History / Discussion / Pledge Drive
See Google group for original discussion, together with the suggestion that it be used for cutting larger pieces of timber - opening up the possibility that we also get a Scrollsaw for fine, curved work.
Currently the workshop has a Bandsaw. Jake posted a message on the Google groups pointing out:
"The current bandsaw gets a lot of use. Since we bought a new pillar drill a larger floor standing bandsaw seems like the next logical step.
It's also not perfect, the blade wanders, and it doesn't have a steady cut speed, it seems to cut well then appears to slow down, plus the vibrations cause the blade to move around a lot. In general it can be a pain to do some work on it.
To that end, a pledge was started, in order to prompt the purchase of a better bandsaw. Suitable models (listed below) costing in the range £350 - £500 are being considered,
Possible saws to choose from (extracted from the Google Group):
£370 http://www.dm-tools.co.uk/product.php/section//sn/METBAS317
£478 http://www.machinemart.co.uk/shop/product/details/bas317-305mm-bandsaw?da=1&TC=SRC-bandsaw
Wide range: http://www.poolewood.co.uk/acatalog/Band_Saws.html
Pledge Details
| Name | Amount | Paid | Notes |
|---|---|---|---|
| Gazz | £5 | Y | In cashbox |
| Seb Price | £10 | Y | In cashbox |
| Wendy | £10 | Y | Bank transfer |
| Andrew Th | £20 | Y | Bank transfer |
| David C | £10 | Y | Bank transfer 2/10/13 |
| Dominic | £20 | Y | Bank transfer |
| Gareth | £20 | Y | Bank transfer |
| Ian D | £20 | Y | Bank transfer |
| Jake | £10 | N | |
| James F | £20 | Y | Bank transfer |
| James H | £20 | N | |
| Joe | £20 | N | |
| Matt Little | £10 | Y | Bank Transfer 27/9/13 |
| Matt Lloyd | £10 | Y | Bank Transfer 2/10/13 |
| Matt Spandex | £10 | N | |
| Michael E | £10 | Y | Bank transfer |
| Rave | £10 | Y | Bank Xfer |