Difference between revisions of "Les Plywood"
(Created page with "==Intro== Can a guitar be produced through laser cutting? Probably, yes but anyone who knows anything about guitars would ask why... Well, I wanted to give this a go for no...") |
m |
||
| Line 25: | Line 25: | ||
==Step 2 - Laser Cutting== | ==Step 2 - Laser Cutting== | ||
| − | I took a couple of videos and have uploaded them to youtube. See | + | I took a couple of videos and have uploaded them to youtube. See below. |
| + | |||
| + | |||
| + | {{#widget:YouTube|id=UyzyRIiHLYk}} | ||
| + | {{#widget:YouTube|id=QSd0VTxWoLk}} | ||
| − | |||
| − | |||
Apologies about the vertical video, what was I thinking! | Apologies about the vertical video, what was I thinking! | ||
Revision as of 19:23, 21 December 2018
Intro
Can a guitar be produced through laser cutting? Probably, yes but anyone who knows anything about guitars would ask why... Well, I wanted to give this a go for no real reason other than its something to do that will challenge my skills. I am under no illusions that plywood is not an ideal material for an electric guitar but I'm going to try it anyway!
Step 1 - CAD
Model in Fusion 360
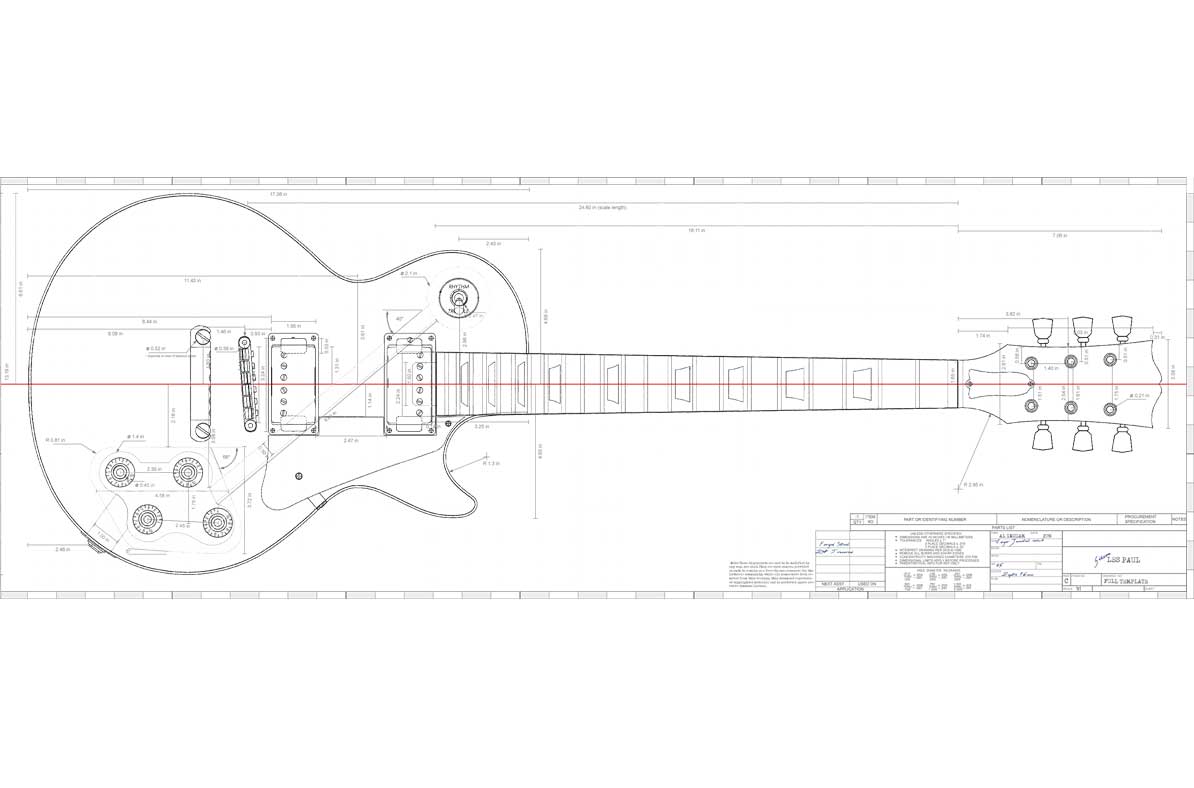
First things first I needed a model to create the DXF files for the laser cutter. I used a reference image that I found online and modelled it up in Fusion 360. See Here for the reference I used. I have deviated slightly from the plan as it is very badly drawn and doesn't follow any engineering standards at all. Anyway, it was good enough for me to put together a model :)

Once I had the model in Fusion 360 I produced a stack of planes that intersected the model and put a blank sketch on each of these planes. I then named all of the sketches to DXF Sketch 1 through to 8 as shown in the image. Fusion picks up the geometry of the model and adds it to the sketch automatically so all you then have to do is right click the sketch and save to DXF.


Arrange in Inkscape
With the DXF stack ready I then moved over to inkscape. Importing the sketches one at a time (Making sure to check that I was working in mm) and arranging them onto the 800mmx600mm page resulted in something that looks like this. These can then be taken over to Lasercut5.3 via any method you prefer.

Step 2 - Laser Cutting
I took a couple of videos and have uploaded them to youtube. See below.
Apologies about the vertical video, what was I thinking!
Step 3 - Gluing
Alignment
I put some through going 5mm holes into the model for aligning the stack. I used M5 machine bolts and am hoping to be able to unscrew them once the glue has dried. This alignment method has worked quite well but hasn't resulted in a perfectly smooth external surface. Oh well, the imperfections can be sanded away and any that remain will just add character. The very top layer was aligned using 10mm dowels in the holes where the bridge will go. Seemed to work ok!


Clamping Arrangement

Step 4 - To be updated
Still a WIP. Will update this page as the project progresses.