Mug Presses
Becky & Tom from Etsy shop SkylineUK have kindly donated their mug printing kit to the hackspace.
The kit includes:
- Two mug heat press machines (UKPress Blue Wave MP160 and PixMax)
- EPSON XP-215 printer with Continuous Ink Supply System (CISS) for sublimation ink
- spare (sublimation) mugs
- sublimation paper
- sublimation ink
This page is currently simply a summary of info from the demo/workshop Tom gave us on the use of the kit. It is intended as a first reference guide to using the printer and presses in order to make beautiful custom mugs.
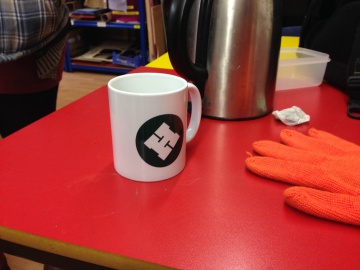
1st Mug Hackspace Side
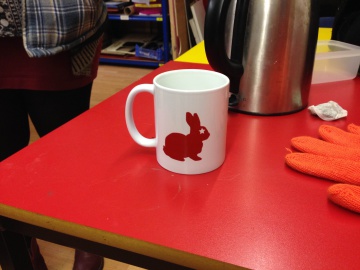
1st Mug Rabbit Side
Mug Printing Demo Workshop


Note: The instructions below have not been tested. Please try to follow them and make amendments and updates to this wiki page.
Brief description
The procedure is simple and quick, it only takes a few mins to make your mug. You have a design you want to print on a mug (it could be a photo, an inkscape design, a figure from your word document, etc). You print it in colour on sublimation paper using the EPSON XP-215 printer, making sure the size will fit on the mug. You turn the heater on the press machine. By the time it heats up (a min or so) your print should have dried and be ready to use. Wrap the printed side around the mug, fix it with Kapton tape, put the mug in the machine and press the red button. Remove the mug when you hear the beep. Your mug is ready. (Obviously this only works well with special sublimation mugs like these ones.)
Detailed Instructions
Printer Connection, Calibration (Head Alignment) and Nozzle Check/Cleaning
- You can connect to the EPSON XP-215 printer either by usb or wireless.
- You should not need to calibrate the printer unless it has been recently moved (which would have changed the position of the printheads and the ink in the system). Utility tool for printer is included in drivers for EPSON XP-215. Run the Print Head Alignment client, which will involve printing calibration pages and informing the client of the best printed bits in these printed pages. In each iteration you will have to enter the best printed number from each numbered section. If after finishing the calibration you see wide strips of pale colour running down the printed calibration page, then there is likely too much ink in the system (because of a recent relocation of the printer). If so, try print a large mount of colour (e.g. large squares of different colours in a page). This should fix it.
- Before printing your design on sublimation paper it is a good idea to print a test page (on ordinary paper). Equivalently, you can run the Nozzle Check in the Utility tool which will ask you to print a test page. Look at the top left corner of the printed test page and you should see two arrays of thin parallel lines (the left one in black, the right one in different colours). If any of these lines is broken, run the Head Cleaning tool and then print another test page to check it's come out all with continuous lines. You may have to repeat this process.
Print Preparation & Printer Settings
- In Inkscape (or anywhere else) make a box of size 205mm x 85mm or smaller. This is the maximum size that will fit on a mug.
- Appropriately scale and position your design/photo/figure in the box. Then delete the box.
- Flip everything (otherwise your image will be printed mirrored)
- Best printer settings tend to be about the worst quality photo option (better that that may cause slight bleeding). In particular, choose Image quality 360dpi, then choose printer EPSON XP215. Under Advanced, choose automatic --> quality, and print quality --> photo
- Make sure the sublimation paper has no marks, it is clean and free of fluff (which apparently prints really well!)
- Print on the smoother of the two sides of the sublimation paper
Mug Press
- Use the Black Mug Press. (The heating element currently installed in the Blue Mug Press is for smaller (8oz) mugs, and there may also be minor issues with the electronics in the Blue Mug Press, which we'll check ASAP)
- Turn on the mug press. It should be already set to T=180C and the press time to 160sec
- It should take less that a min to heat up, which is enough time for your printed design to dry.
- If Temperature and Time settings are different you can reset them. Repeatedly pressing Set button goes like (current Temp reading) --> SH (set Temp) --> St (set time)
- Cut the printed page around your design. You can cut a rectangle of maximum size 205mm x 85mm (otherwise the paper will extend beyond the edges of the mug and will burn).
- Wrap your cut print around a sublimation mug. Stick with kapton tape along the edges. Make sure there is no dust/fluff on the edges of paper (it will print!). Make sure there is no paper over the edge of the mug (it will burn and make your mug edges yellow). Make sure there is no dust/fluff on the kapton tape itself (it will print along the edges of the image!).
- Fit the mug in the machine and press red button, beeper will sound once time is up (normally set to 160 sec).
- Press red button again before turning off. (This will reset timer for when it is switched on next time.)
- Remove your mug (with a heat resistant glove) and let it cool down. Enjoy your tea.
Other Relevant Comments
- The settings mentioned above (printer settings, heat press temperature and time settings) are suggestions, selected after trial and error. You can of course try your own settings/fine tunings.
- The above works with special sublimation mugs (cost less than a pound each). There is also sublimation coating you can apply to ordinary mugs but this has been tried and results have not been as successful.
- Sublimation paper can be purchased from here
- Curious thing: why is it that dust/fluff print so well on sublimation mugs?