Difference between revisions of "Skateboard Banjo"
m (Danspencer101 moved page Project:Skateboard Banjo to Skateboard Banjo over redirect) |
|||
| (25 intermediate revisions by 2 users not shown) | |||
| Line 1: | Line 1: | ||
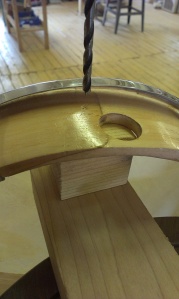
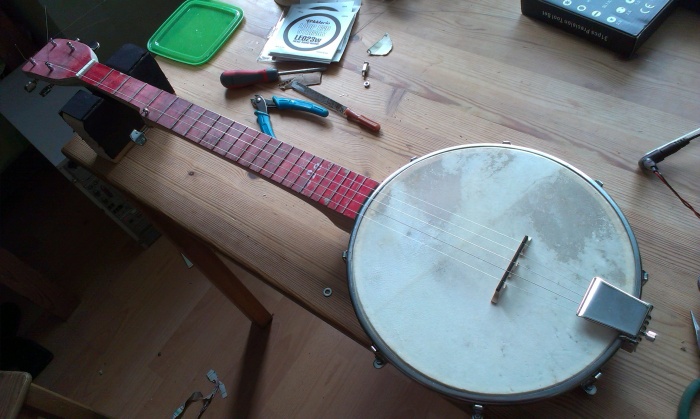
| + | {{project|image=File:Skanjo-IMAG2710.jpg|created=25/6/2013|type=member|primary=[[User:Msemtd|Michael Erskine]]|status=Complete}} | ||
| + | ([[User:Msemtd#Projects| Michael's project list]] and [[:Category:Michael's Projects | properly documented project list!]]) | ||
| + | [[Category:Projects]] | ||
| + | [[Category:Musical Instrument Making]] | ||
| + | [[Category:Michael's Projects]] | ||
| + | |||
= Project Plan = | = Project Plan = | ||
| − | |||
Use old skateboard decks to make the neck (and other parts) of a tenor banjo. A skateboard deck has a natural bend at the kicktail for the headstock making the underside of the deck a slightly convex fretboard due to the deck's concave. Skate decks are typically 7-ply Canadian Maple and are very stiff. I will be laminating two decks together for extra depth and stiffness. I want to retain the authentic used skate deck damage (within reason) on the fingerboard. | Use old skateboard decks to make the neck (and other parts) of a tenor banjo. A skateboard deck has a natural bend at the kicktail for the headstock making the underside of the deck a slightly convex fretboard due to the deck's concave. Skate decks are typically 7-ply Canadian Maple and are very stiff. I will be laminating two decks together for extra depth and stiffness. I want to retain the authentic used skate deck damage (within reason) on the fingerboard. | ||
| Line 8: | Line 13: | ||
* compare with commercially available, e.g. Ozark: 2102G 5-String Open Backed Banjo (Scale length - 697mm = 27.45") | * compare with commercially available, e.g. Ozark: 2102G 5-String Open Backed Banjo (Scale length - 697mm = 27.45") | ||
* NB: I now _do_ have a good idea of what I'm doing! | * NB: I now _do_ have a good idea of what I'm doing! | ||
| − | * neck: this is the skate deck part - I have two identical | + | * neck: this is the skate deck part - I have chosen two identical slightly thrashed Union blank decks (same pressing, same concave) which I've glued together with Gorilla Glue (see pics) |
* body/pot: I'm going to use a wooden hand drum with tensioners which will give me a basic body for little cost and little work. In the future I want to glue up and turn my own rims on the lathe. | * body/pot: I'm going to use a wooden hand drum with tensioners which will give me a basic body for little cost and little work. In the future I want to glue up and turn my own rims on the lathe. | ||
* bridge: current thinking - just a piece of skate deck | * bridge: current thinking - just a piece of skate deck | ||
| Line 22: | Line 27: | ||
Geometry, plans and other info: - | Geometry, plans and other info: - | ||
* http://www.banjohangout.org/archive/179296 | * http://www.banjohangout.org/archive/179296 | ||
| + | * http://www.frets.com/ | ||
* http://www.stewmac.com/freeinfo/a-scalelength | * http://www.stewmac.com/freeinfo/a-scalelength | ||
* http://www.stewmac.com/FretCalculator | * http://www.stewmac.com/FretCalculator | ||
| Line 233: | Line 239: | ||
= Nut carving and fret fitting = | = Nut carving and fret fitting = | ||
| − | The set of stings I have is D'Addario J61 medium gauge ; .010 - .012 - .016 - .023w - .010 which I bought from Dave Mann Music in Nottingham for £4.99. The bone nut blank was also from Dave Mann for a price of £3.99 if I remember correctly. My design has 9mm between the string centres giving a 36mm span between strings 1-4. I had already "fitted" the nut width and length (along the neck-wise) but not set the depth -- little point until the height of the frets was established. I marked the basic fret height with a "half-pencil" that I had made for just this job. Then I set feeler gauges to a depth of 2.5mm to mark the initial depth of the strings (to be refined later) and cut guides for each string down to this level using a "zero-kerf" pullsaw. I then removed the nut and ground down the basic height and roll-over on the bench sander. When I refitted the nut I used a few drops of superglue. In the second picture one can see the luthiers' neck stand I made out of some scrap wood with a protective neoprene surface. | + | The set of stings I have is D'Addario J61 medium gauge ; .010 - .012 - .016 - .023w - .010 which I bought from Dave Mann Music in Nottingham for £4.99. The bone nut blank was also from Dave Mann for a price of £3.99 if I remember correctly. My design has 9mm between the string centres giving a 36mm span between strings 1-4. I had already "fitted" the nut width and length (along the neck-wise) but not set the depth -- little point until the height of the frets was established. I marked the basic fret height with a "half-pencil" that I had made for just this job. Then I set feeler gauges to a depth of 2.5mm to mark the initial depth of the strings (to be refined later) and cut guides for each string down to this level using a "zero-kerf" pullsaw. I then removed the nut and ground down the basic height and roll-over on the bench sander. When I refitted the nut I used a few drops of superglue. In the second picture one can see the luthiers' neck stand I made out of some scrap wood with a protective neoprene surface. I don't have, and am unlikely to obtain, a set of nut files and so I'm going to hack some tiny abrasive strips with exact tolerances. The nut will remain rough until I have the strings in place. |
| + | |||
| + | I found a pair of hefty long-nosed pliers at the hackspace that had a handy gnurled section that could hold my fret wire for bending by hand. With some trial-and error I found that the best way to get the fret wire to sit nicely was to put a serious amount of over-bend in the wire, use plenty of superglue, hammer in and then clamp the fret down while the glue dried. I can't properly recall the number of hours I put into the frets but it was ridiculous! The fretboard for the next banjo will be done in a completely different way (hint: frets cut way before the neck is shaped when the sides can be parallel and using a laser-cut jig for guiding the pull-saw). To be fair I was away in Norfolk for a few days so I wasn't able to spend every last available minute of this week at the Hackspace (although I did have a lovely time with my family who still recognise me!) | ||
<gallery widths=300px heights=300px> | <gallery widths=300px heights=300px> | ||
File:Skanjo-IMAG2686.jpg | File:Skanjo-IMAG2686.jpg | ||
File:Skanjo-IMAG2687.jpg | File:Skanjo-IMAG2687.jpg | ||
| + | |||
| + | File:Skanjo-IMAG2705.jpg | ||
| + | |||
| + | File:Skanjo-IMAG2706.jpg | ||
| + | |||
| + | File:Skanjo-IMAG2703.jpg | over-bend in frets prior to fitting | ||
| + | |||
| + | File:Skanjo-IMAG2701.jpg | glue and clamps | ||
| + | |||
| + | File:Skanjo-IMAG2708.jpg | all 22 frets in place | ||
| + | |||
</gallery> | </gallery> | ||
| + | |||
| + | = Stringing and first setup = | ||
| + | |||
| + | The last job before stringing was to affix the tuning pegs. I pre-drilled shallow 1.5mm holes to guide the little screws slightly. They're rather cheap and nasty and the screw heads can't take much torque before failing as I learned with the first screw. I was sort of expecting this and I had a couple of spare screws so no worries. I couldn't really wait to make the full alterations to the 5th string peg which involves bending one of the screw tabs down so I just bent it a little using some molegrips. There isn't really room to get a hammer in there to finish the job as I imagined I would so I just left it for the time-being as it is just non-functional eye-candy! | ||
| + | |||
| + | <gallery widths=300px heights=300px> | ||
| + | File:Skanjo-IMAG2711.jpg | ||
| + | File:Skanjo-IMAG2712.jpg | ||
| + | </gallery> | ||
| + | |||
| + | Using the stringing technique described at | ||
| + | http://www.frets.com/FretsPages/Musician/Banjo/BanjoStringing/banjostr1.html | ||
Strings in the D'Addario J61 medium gauge set: - | Strings in the D'Addario J61 medium gauge set: - | ||
| Line 250: | Line 281: | ||
</pre> | </pre> | ||
| − | I | + | Kind of fiddly and a bit exciting as the anticipation of hearing the thing approaches! The tail-piece assembly seemed to be working well but required some adjustment. |
| + | |||
| + | <gallery widths=700px heights=700px> | ||
| + | File:Skanjo-IMAG2710.jpg | Strung for the first time! | ||
| + | </gallery> | ||
| + | |||
| + | The immediate issue was the height of the action: crazy-high! Some serious adjustments will be required of the join between the neck and the pot (although I always suspected that this might be necessary). The bass string (4th) was unable to stay in the initial nut groove so I had to file it out slightly. Remember: the nut finishing is still on the TODO list!) | ||
| + | |||
| + | To make the action easily adjustable the dowel fixing hole at the tailpiece end needs to be turned into a slot. To avoid the need to remove all the strings when removing the tailpiece a temporary rapstrap clamp can be rigged as shown in the photos. The strings are loosened and the bridge dropped. Then the tailpiece can be dismantled and the strings put out of the way of any works on the pot. The slot is carefully made and filed smooth and after a little sanding on the heel join between the neck and pot we have a good adjustable action. | ||
| + | |||
| + | <gallery widths=300px heights=300px> | ||
| + | File:ProjectX-IMAG2719.jpg | for restringing | ||
| + | File:ProjectX-IMAG2721.jpg | temporary removal of tailpiece | ||
| + | File:ProjectX-IMAG2722.jpg | hole to be made into adjusting slot | ||
| + | File:Skanjo-IMAG2724.jpg | pillar drill setup | ||
| + | File:Skanjo-IMAG2723.jpg | slot filing | ||
| + | </gallery> | ||
| + | |||
| + | After a few reassemblies and a lot of tuning we have a nice playable banjo; playable by those who can already play -- i.e. not me! The learning process has begun though and I'm working on old-time clawhammer style as taught on YouTube by rpeek (http://www.youtube.com/playlist?list=PLD8B12621CCAB1A11). | ||
| + | |||
| + | The route of the strings on the peg head was annoying as the outermost strings which are not pulled down enough at the nut have a tendency to pop out of the nut when hammered. The innermost two strings were quite low but also splaying out and cutting into the nut. I fashioned some little string tree hooks from some clipframe clips. They seem to work rather well! | ||
| + | |||
| + | <gallery widths=300px heights=300px> | ||
| + | File:Skanjo-IMAG2726.jpg | string tree | ||
| + | File:Skanjo-IMAG2725.jpg | string tree | ||
| + | </gallery> | ||
| + | |||
| + | = Next steps = | ||
| + | |||
| + | Whilst "playing" I find the head tensioning hardware is kinda harsh on my ribs and right arm so I want to provide some protection on the back rim and maybe an arm-rest. This needs to be done without sacrificing the aesthetic, adding too much weight or affecting the sweet sound. The frets and nut still require work and I've ordered a set of tiny nozzle cleaning files from ebay to assist. I'm told these are close to useless but I don't really care. I have ordered a 99 cent capo from ebay. I also need to make myself a lightweight travel bag and I have some good ideas already in this department. | ||
= Bill of Materials = | = Bill of Materials = | ||
| − | + | {| class="wikitable sortable" | |
| − | + | |- | |
| − | + | !item!!from!!price | |
| − | + | |- | |
| − | + | |Union Blank skate decks x2||my shed - repurposed scrap||originally £20 each but essentially free | |
| − | + | |- | |
| − | + | |Percussion Plus 10" tunable hand drum||Amazon||£6.66 | |
| − | + | |- | |
| − | + | |Set of 6 guitar tuners||ebay seller China||£2.99 Free P&P | |
| − | + | |- | |
| + | |Dowel-stick||my shed - repurposed scrap||free | ||
| + | |- | ||
| + | |D'Addario J61 strings||Dave Mann Music||£4.99 | ||
| + | |- | ||
| + | |Fret wire 30cm x4 ||Jake||£4.00 | ||
| + | |- | ||
| + | |Bone nut blank||Dave Mann Music||£3.99 | ||
| + | |- | ||
| + | |"Elton" style chrome-plated tailpiece||ebay seller China||£3.72 Free P&P | ||
| + | |- | ||
| + | |assorted screws bolts and other hardware||Hackspace consumables||included in membership | ||
| + | |- | ||
| + | |} | ||
| + | Total: £26.35 (NB: does not include a billion hours in labour costs!) | ||
| + | |||
| + | |||
| + | Here we see the Skanjo with its kinfolk: skateboards, Toby's Canjos, etc. | ||
| + | <gallery widths=300px heights=300px> | ||
| + | File:ProjectX-IMAG2716.jpg | alongside brethren | ||
| + | File:ProjectX-IMAG2714.jpg | alongside brethren | ||
| + | File:Skanjo-IMAG2727.jpg | with "real" banjo | ||
| − | + | </gallery> | |
| − | |||
| − | |||
Latest revision as of 11:58, 5 February 2019
| Skateboard Banjo | |
|---|---|
 | |
| Primary Contact | Michael Erskine |
| Created | 25/6/2013 |
| Status | Complete |
| Type | Members Project |
| QR code | |
( Michael's project list and properly documented project list!)
Project Plan
Use old skateboard decks to make the neck (and other parts) of a tenor banjo. A skateboard deck has a natural bend at the kicktail for the headstock making the underside of the deck a slightly convex fretboard due to the deck's concave. Skate decks are typically 7-ply Canadian Maple and are very stiff. I will be laminating two decks together for extra depth and stiffness. I want to retain the authentic used skate deck damage (within reason) on the fingerboard.
General
- http://en.wikipedia.org/wiki/Banjo
- Hmmm, 5-string or Tenor? I'd love a 5-string so I'll try to make that work
- compare with commercially available, e.g. Ozark: 2102G 5-String Open Backed Banjo (Scale length - 697mm = 27.45")
- NB: I now _do_ have a good idea of what I'm doing!
- neck: this is the skate deck part - I have chosen two identical slightly thrashed Union blank decks (same pressing, same concave) which I've glued together with Gorilla Glue (see pics)
- body/pot: I'm going to use a wooden hand drum with tensioners which will give me a basic body for little cost and little work. In the future I want to glue up and turn my own rims on the lathe.
- bridge: current thinking - just a piece of skate deck
- nut: current thinking - just a piece of skate deck
- tuning hardware: ebay cheapest set of 6 guitar tuners 3x left 3x right
- strings: whatever becomes available
- tensioning bars: I'll see how the hand drum and neck come together
- tailpiece: cheapest ebay magic!
Geometry, plans and other info: -
- http://www.banjohangout.org/archive/179296
- http://www.frets.com/
- http://www.stewmac.com/freeinfo/a-scalelength
- http://www.stewmac.com/FretCalculator
| Banjo | # frets | scale |
|---|---|---|
| Gibson 26-1/4" | 22 | 26.250" |
| Long-neck 32-1/4" | 25 | 32.250" |
| Tenor 22-1/4" | 19 | 22.250" |
| Vega 27" | 22 | 27.000" |
Progress: Week 1
Here we have some progress photos of the deck lamination and slice-up. Note: I selected the two decks that had the most accurately matching concave without too much damage. Also, I removed the griptape! As Norm Abram says, "You can never have too many clamps". Using bamboo chopsticks as dowels to align the bolt-holes, fill them in, and perhaps add a little strength.


The skate deck glue-up has been sliced down to about 95mm wide. The nose and tail beyond the bolt-holes are about 135mm and 125mm long. The truck bolt mountings are 59mm long each and there is 350mm between the innermost bolt-holes. The bolt-holes are 35mm between (46.5mm including holes).
The nut is to be located immediately before the kicktail starts to drop away. A centre line is scribed that also defines the location of the third string. The scale length will be decided when the hand drum is obtained and the neck-body join is decided.
The width of the neck at the nut is 1 1/4 inch on a lot of banjos I've seen but I think I'd like to use 1 3/8 inch to be more like my ukulele. This width will fall almost exactly between the bolt-holes.
- 35 millimeter = 1.377 inch and 1.375 inch (1 & 3/8) = 34.925 millimeter
The neck at the nut will be slightly offset from the centreline due to the asymmetric narrowing after the 5th string. The width where the neck meets the body is yet to be decided.
The width of the headstock will be decided largely by the string tensioning hardware and the aesthetics of whatever skate-style I can incorporate (e.g. a rounded head like modern popsicle decks or something more old-school)
Neck and pot mounting: I watched some yoochoob vids on the subject and for my purposes I'm going to have to see how things look when I get the hand drum (ebay bid in progress!). What is immediately clear is that the neck thickness needs to be increased where it joins the pot (forgot what the name of that bit is!)
Metric Scale Length
I have marked the fret locations, measuring carefully from the nut on each occasion. The fret wire I have available at the hackspace is rather fine (for a uke) but we don't expect any real problems to result from it. The 596mm fret scale is 25" in old money so it is slightly smaller than a typical old-time open back banjo.
    596 mm fret scale

    fret   |   from nut   |   fret to fret
    1  |  33.451 mm  |  33.451 mm  (nut-1)
    2  |  65.024 mm  |  31.573 mm  (1-2)
    3  |  94.826 mm  |  29.802 mm  (2-3)
    4  |  122.954 mm  |  28.128 mm  (3-4)
    5  |  149.504 mm  |  26.550 mm  (4-5)
    6  |  174.564 mm  |  25.060 mm  (5-6)
    7  |  198.218 mm  |  23.654 mm  (6-7)
    8  |  220.544 mm  |  22.326 mm  (7-8)
    9  |  241.616 mm  |  21.072 mm  (8-9)
    10  |  261.506 mm  |  19.890 mm  (9-10)
    11  |  280.280 mm  |  18.774 mm  (10-11)
    12  |  298.000 mm  |  17.720 mm  (11-12)
    13  |  314.725 mm  |  16.725 mm  (12-13)
    14  |  330.512 mm  |  15.787 mm  (13-14)
    15  |  345.413 mm  |  14.901 mm  (14-15)
    16  |  359.477 mm  |  14.064 mm  (15-16)
    17  |  372.752 mm  |  13.275 mm  (16-17)
    18  |  385.282 mm  |  12.530 mm  (17-18)
    19  |  397.109 mm  |  11.827 mm  (18-19)
    20  |  408.272 mm  |  11.163 mm  (19-20)
    21  |  418.808 mm  |  10.536 mm  (20-21)
    22  |  428.753 mm  |  9.945 mm  (21-22)
Week 2: More parts and progress
I spent a hot sunny afternoon in Nottingham touring around all the music shops and I picked up a few supplies: I got myself some medium gauge banjo strings, a 5-string bridge, and a bone nut blank. I didn't really want to use bone but since my drum head is likely to be goat skin I don't think it will be winning any ethical build prizes! (I do plan to replace the head with a typical Remo banjo head if all goes well).
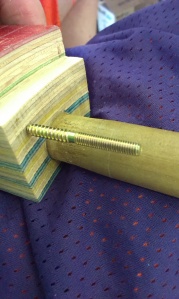
The hand drum (http://www.percussionplus.co.uk/products/hand-held/hand-drums/10-tunable-hand-drum-pp877.aspx) has arrived: this one is from Amazon returns and was £6.66 with free postage. It may be a bit shallow but it has a finger hole about 20mm in diameter that will hold the dowel stick. I have glued up the heel so it is 5 decks thick. I had no remaining parts or the original 2 decks that had a suitable concave so I used some spare bits of my old Enjoi Rodney Mullen deck that I got back off Jake who is using it for his Ukelele Bass project (thanks Jake!). I was looking around for 20mm dowel and I found the broken stick from my old Nimbus 2000 pool sweeping brush in the shed. It's just over 21mm and is well weathered so I was able to get a snug fit in the hand drum with a bit of dremel sanding of the hole. The dowel will be embedded in the heel end of the neck and the other end will set the action height with a possibly adjustable/shimable screw-slot end that passes through the far end of the drum rim.


Now we look at fitting with a dowel stick and start to consider the neck shaping and heel carving. Some pro tips at http://blog.boymeetsbanjo.com/2011/10/14/carving-the-neck/ and inspiration at http://www.deepcreekstrings.com/p/instruments.html
Neck Shaping
I had a bit of a mental crisis when it came to shaping the neck - it felt too horrible to start to cut into what is just a throwaway blank at the end of the day! I got quite wound up thinking that I needed to CNC it in order to get it "right" and make laser cut templates and jigs so I could get good lines with a router. It took a day or so to get my mind straight and get to work shaping just by hand with rasps, files and sandpaper. I found it very absorbing and I put in a crazy amount of time observing the ply layers and grain, working at the imperfections and getting a pleasing shape that felt right.


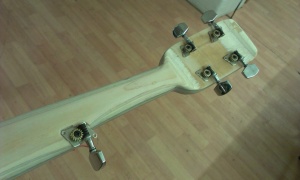
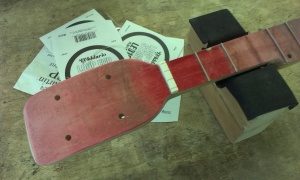
For the tuning head I want the place the tuning pegs in the standard (new-school) truck bolt-hole pattern and shape the end like a miniature new-school deck. The holes need to be 2.1" x 1 5/8" apart (== 42.1mm x 53.3mm). I need to leave enough tail to wear down like a well used deck -- the existing worn-down nose/tails had to be cut off to avoid massive voids when laminating. The tuning head needs to be significantly thinner if I am to use standard sized tuning pegs. I intend to cut a scoop out of the back side to about 13 ply thick (griptape side of the decks!) which will lighten up the tuning head and hopefully bring out some of the beauty of the wood.
Tuning Head and Neck Mounting
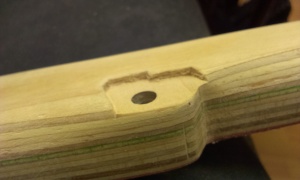
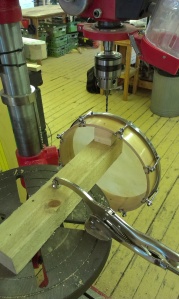
I managed to spend large parts of both Saturday and Sunday in the Hackspace workshop working on thinning the headstock and mounting the pot to the neck. I made a router template so I could cut the recess for the tuning rim. The first pass brought out the beautific green laminate but unfortunately it was slightly too shallow and I had to chisel it out a little further. I spent a lot of time setting up to drill the dowel hole in the neck, creating a makeshift jig to ensure that the hole was exactly vertical... and then finding that the pillar drill was not exactly vertical! Thankfully I discovered my assumption before making the cut. The dowel had to be sanded to fit the hole then glued and screwed. Additional screws might to be necessary to give additional strength to the heel ply layers.


Week3: Frets and Pegs
Drilling the headstock for the pegs was trivial but it was nice to see them put in place. I still had a lot of sanding to do so I didn't fully install them yet. I also received a cheap ebay tailpiece which will need work to get fitted properly.
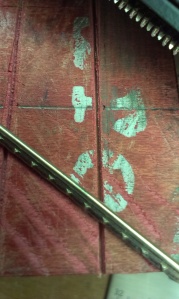
Fretting - it really is worrysome! I nearly had a breakdown over this. Without a replaceable fretboard I had no real room for error but the errors kept-a-comin'! Using the Japanese pull saw with depth gauge was quite a trial - the grain of the fretboard top ply goes lengthways so I had to use the cross-grain edge. The cuts were easier to make and more accurate than with the cheap pull saw I used for the test fret. Getting the fret wire to go in and stay in was a bit of a challenge. I gave up after 3 frets and returned home to read up on the subject. It was clear I needed a way to safely bend the fret wire to fit the convex deck.

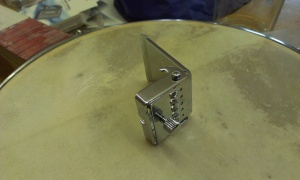
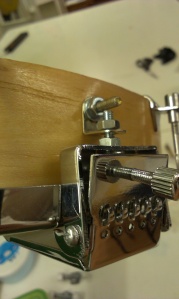
Cheap ebay tailpiece
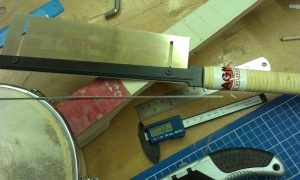
Japanese pullsaw with depth gauge


On Wednesday's open hack night I was able to take care of a few outstanding problems as well as a lot more hand sanding. The major work was in fitting the 5th string tuning peg. I had wrestled long and hard with the idea of just forking out £12 for a specialised tuning peg but that would be giving up! Eventually I decided on a deep-set peg almost the depth of the neck. I chiselled out a little recess about 2 ply deep so that the string winding part was just high enough (the 5th string nut will also be quite low profile). I fitted a shim of spring steel around the dowel stick where it passes through the rim of the pot to give it a more snug fit and to hide the over-worked end. I ground the tangs off my cheap ebay tailpiece and did a bit of creative bending to make it fit the tuning ring. Finally, I worked out a good method for safely pre-bending fretwire using the groove of a machine vice to hold the profile vertical.
Drilled
Roughed-out

Height check
Carved
Sanded
Adapting the tailpiece
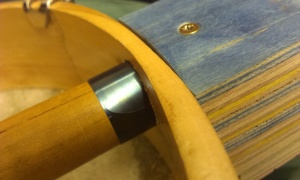
Spring steel shim
Dowel stick now waxed
All tuning pegs in place
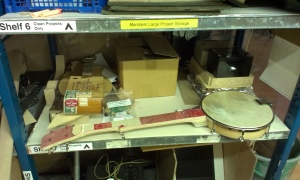
On the large projects shelving beside Jake's cigar-box uke


Sidenote: Next luthier project: antique banjolele restoration
I was blessed to be given an antique banjolele to restore. Many thanks to Lionel and his long departed uncle "AB" -- I will try my best to make this beautiful instrument sing again! Naturally it will have its own project page: Antique Banjolele Restoration
Neck Bracing
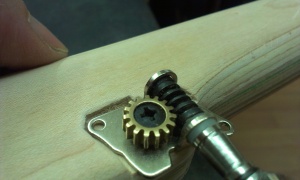
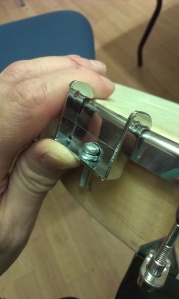
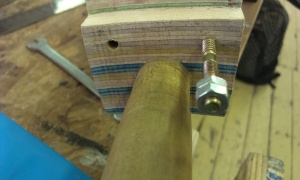
I got a good 4 hours or work in on Saturday (July 20th) during the luthiers' workshop time (just Gareth Howell and myself making instruments on this occasion) and it really makes a difference when I have time to work with care and have somebody to help with advice. I removed some of the frets I had installed that just looked plain wrong and filled the cuts with superglue and sawdust. I hope to cut the slots again but this time at least visually parallel to the others! I managed to cut some more fret slots further along the neck that looked OK but decided not to put in any more frets for now. The tailpiece now has a little meccano bracket which may prove to be insufficient but we'll see when it is strung. I got a little plastic toy skateboard from a pound shop; I want to make use of the trucks - perhaps just decoratively - maybe functionally! I had been obsessing all week about mechanisms to properly secure the pot to neck connection (the dowel stick only serves to align the neck). For all the fancy brackets I had drawn on paper I finalised on a simple pair of bolts... well, I was sure it would be simple but it turned out to be a ton of work! Firstly now the dowel stick is glued and screwed in place there is no way to get a drill chuck close enough to drill the very necessary pilot holes for the screw ends so I had to use the snake extension on a Dremel. Next I found that with the bots installed it was really difficult to work out the exact positions for the holes to be drilled in the pot because although the bolt ends could make indents in the rim, they could not easily be positioned correctly because the bolt at the far end of the dowel was the exact same length and could not be located in its hole to give the dowel the right alignment. With some assistance I was able to position the first hole in round about the right place and thankfully I was able to make enough adjustment on the second hole to correct the slight error. I was very pleased with the final result: straight and true, a good solid connection.
Tailpiece meccano bracket
Trucks!
Bolt position
Dremel drilling
First bolt located
Drilling pot rim with (curved block)

Driling setup
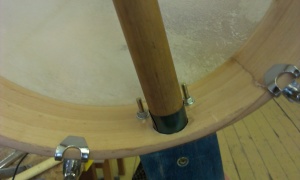
All nicely secured and straight


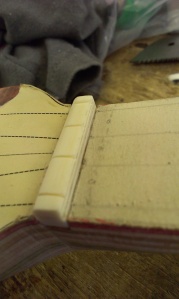
Nut carving and fret fitting
The set of stings I have is D'Addario J61 medium gauge ; .010 - .012 - .016 - .023w - .010 which I bought from Dave Mann Music in Nottingham for £4.99. The bone nut blank was also from Dave Mann for a price of £3.99 if I remember correctly. My design has 9mm between the string centres giving a 36mm span between strings 1-4. I had already "fitted" the nut width and length (along the neck-wise) but not set the depth -- little point until the height of the frets was established. I marked the basic fret height with a "half-pencil" that I had made for just this job. Then I set feeler gauges to a depth of 2.5mm to mark the initial depth of the strings (to be refined later) and cut guides for each string down to this level using a "zero-kerf" pullsaw. I then removed the nut and ground down the basic height and roll-over on the bench sander. When I refitted the nut I used a few drops of superglue. In the second picture one can see the luthiers' neck stand I made out of some scrap wood with a protective neoprene surface. I don't have, and am unlikely to obtain, a set of nut files and so I'm going to hack some tiny abrasive strips with exact tolerances. The nut will remain rough until I have the strings in place.
I found a pair of hefty long-nosed pliers at the hackspace that had a handy gnurled section that could hold my fret wire for bending by hand. With some trial-and error I found that the best way to get the fret wire to sit nicely was to put a serious amount of over-bend in the wire, use plenty of superglue, hammer in and then clamp the fret down while the glue dried. I can't properly recall the number of hours I put into the frets but it was ridiculous! The fretboard for the next banjo will be done in a completely different way (hint: frets cut way before the neck is shaped when the sides can be parallel and using a laser-cut jig for guiding the pull-saw). To be fair I was away in Norfolk for a few days so I wasn't able to spend every last available minute of this week at the Hackspace (although I did have a lovely time with my family who still recognise me!)
over-bend in frets prior to fitting

glue and clamps
all 22 frets in place


Stringing and first setup
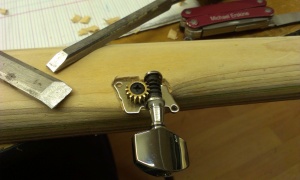
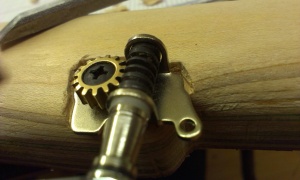
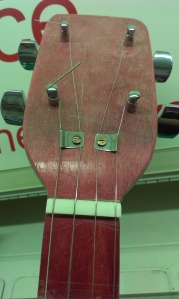
The last job before stringing was to affix the tuning pegs. I pre-drilled shallow 1.5mm holes to guide the little screws slightly. They're rather cheap and nasty and the screw heads can't take much torque before failing as I learned with the first screw. I was sort of expecting this and I had a couple of spare screws so no worries. I couldn't really wait to make the full alterations to the 5th string peg which involves bending one of the screw tabs down so I just bent it a little using some molegrips. There isn't really room to get a hammer in there to finish the job as I imagined I would so I just left it for the time-being as it is just non-functional eye-candy!


Using the stringing technique described at http://www.frets.com/FretsPages/Musician/Banjo/BanjoStringing/banjostr1.html
Strings in the D'Addario J61 medium gauge set: -
    Item #	Note	Inches	mm	lbs	kg
    LE010	D	0.0100	0.2500	13.900	6.300
    LE012	B	0.0120	0.3000	14.100	6.409
    LE016	G	0.0160	0.4064	15.800	7.181
    LE023W	D	0.0230	0.5842	12.100	5.490
    LE010	G	0.0100	0.2500	13.600	6.150
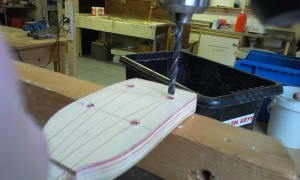
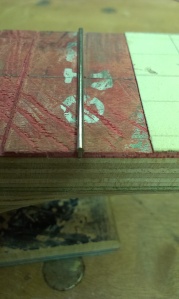
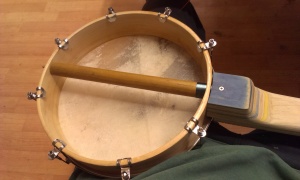
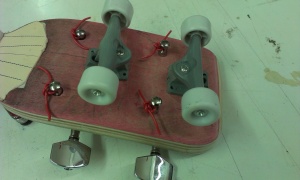
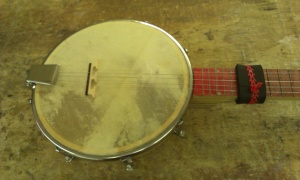
Kind of fiddly and a bit exciting as the anticipation of hearing the thing approaches! The tail-piece assembly seemed to be working well but required some adjustment.
Strung for the first time!
The immediate issue was the height of the action: crazy-high! Some serious adjustments will be required of the join between the neck and the pot (although I always suspected that this might be necessary). The bass string (4th) was unable to stay in the initial nut groove so I had to file it out slightly. Remember: the nut finishing is still on the TODO list!)
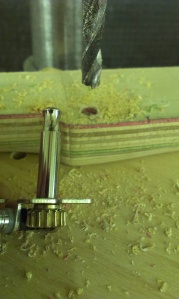
To make the action easily adjustable the dowel fixing hole at the tailpiece end needs to be turned into a slot. To avoid the need to remove all the strings when removing the tailpiece a temporary rapstrap clamp can be rigged as shown in the photos. The strings are loosened and the bridge dropped. Then the tailpiece can be dismantled and the strings put out of the way of any works on the pot. The slot is carefully made and filed smooth and after a little sanding on the heel join between the neck and pot we have a good adjustable action.
for restringing

temporary removal of tailpiece
hole to be made into adjusting slot
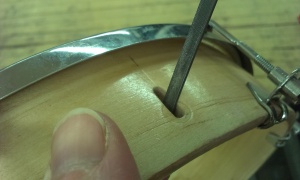
pillar drill setup
slot filing


After a few reassemblies and a lot of tuning we have a nice playable banjo; playable by those who can already play -- i.e. not me! The learning process has begun though and I'm working on old-time clawhammer style as taught on YouTube by rpeek (http://www.youtube.com/playlist?list=PLD8B12621CCAB1A11).
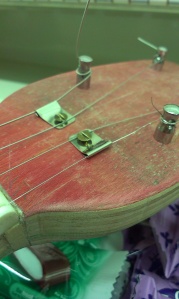
The route of the strings on the peg head was annoying as the outermost strings which are not pulled down enough at the nut have a tendency to pop out of the nut when hammered. The innermost two strings were quite low but also splaying out and cutting into the nut. I fashioned some little string tree hooks from some clipframe clips. They seem to work rather well!
string tree
string tree


Next steps
Whilst "playing" I find the head tensioning hardware is kinda harsh on my ribs and right arm so I want to provide some protection on the back rim and maybe an arm-rest. This needs to be done without sacrificing the aesthetic, adding too much weight or affecting the sweet sound. The frets and nut still require work and I've ordered a set of tiny nozzle cleaning files from ebay to assist. I'm told these are close to useless but I don't really care. I have ordered a 99 cent capo from ebay. I also need to make myself a lightweight travel bag and I have some good ideas already in this department.
Bill of Materials
| item | from | price |
|---|---|---|
| Union Blank skate decks x2 | my shed - repurposed scrap | originally £20 each but essentially free |
| Percussion Plus 10" tunable hand drum | Amazon | £6.66 |
| Set of 6 guitar tuners | ebay seller China | £2.99 Free P&P |
| Dowel-stick | my shed - repurposed scrap | free |
| D'Addario J61 strings | Dave Mann Music | £4.99 |
| Fret wire 30cm x4 | Jake | £4.00 |
| Bone nut blank | Dave Mann Music | £3.99 |
| "Elton" style chrome-plated tailpiece | ebay seller China | £3.72 Free P&P |
| assorted screws bolts and other hardware | Hackspace consumables | included in membership |
Total: £26.35 (NB: does not include a billion hours in labour costs!)
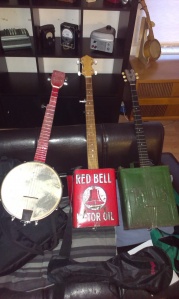
Here we see the Skanjo with its kinfolk: skateboards, Toby's Canjos, etc.
alongside brethren
alongside brethren
with "real" banjo


