Difference between revisions of "Talk:Cheesoid"
(→Brains) |
|||
| Line 259: | Line 259: | ||
* smt caps for smt regulators! | * smt caps for smt regulators! | ||
| − | + | MCU1 PIN usage summary table [https://docs.google.com/spreadsheet/ccc?key=0AsK9pfCIv4uddDlkSkxOMjNaTnlBOWpvUERUYWZGbUE&hl=en_GB here on Google Docs] | |
| − | |||
| − | MCU1 PIN usage summary table on Google Docs | ||
| − | |||
| − | |||
| − | |||
| − | |||
| − | |||
| − | |||
| − | |||
| − | |||
| − | |||
MCU1 software | MCU1 software | ||
Revision as of 17:33, 4 October 2011
Interaction Goals
Cheesoid is intended to be a fully autonomous mobile robot that interacts with people and objects in its environment. Human-Robot interaction is a massive subject but I intend to get some rudimentary (and comedic) speech and general input features in place as soon as possible. The environment interactions will develop as I learn more about sensing and mapping. Since the robot will live at Hackspace I have two basic goals for comedy value: -
- interact with the fridge for cheese status
- interact with the petrol pump for petrol status
So...
- it needs to know where they are to go and talk to them
- the status needs to be stored and needs to be set - Xino at each? Via IRC bot? Some web interface?
- it need to be able to read the status from the fridge and the petrol pump - what sort of interface? IR remote control?
Petrol status
- just a number!
Cheese status
- many cheese types - each with use by date
- Primula status is "in tube"
Human - Robot Interactions: speech
With the eeePC I have a very capable processor on board and I'm taking full advantage of that: -
- using espeak for text to speech
- using sphinx for speech recognition
Text to Speech with espeak
http://espeak.sourceforge.net/
The espeak voices aren't really robotic enough but can be made more so by creating a custom voice
speech recognition with sphinx
http://cmusphinx.sourceforge.net/wiki/tutorialconcepts
The sphinx packages
p    --\ sphinx2-bin                                                                                                                    <none>     0.6-2.1
  Description: speech recognition utilities
    Sphinx 2 is a real-time, speaker-independent speech recognition system.

    This package contains examples and utilities that use Sphinx. It also includes a sample language model that is capable of recognizing simple commands
    like "go forward ten meters" and other commands one might use to tell a robot where to move.
  Priority: optional
  Section: universe/sound
  Maintainer: Ubuntu MOTU Developers <ubuntu-motu@lists.ubuntu.com>
  Compressed size: 129k
  Uncompressed size: 500k
  Source Package: sphinx2
  --\ Depends (3)
    --- libc6 (>= 2.4)
    --- libsphinx2g0 (>= 0.6) (UNSATISFIED)
    --- sphinx2-hmm-6k (UNSATISFIED)
  --\ Packages which depend on sphinx2-bin (0)
  --\ Versions of sphinx2-bin (1)
p    0.6-2.1
Good examples of the use of sphinx: -
Conversations and dialogue
In order to have a meaningful (preferably amusing and slightly uncanny) interaction with humans there needs to be a dialogue and some involvement of non-verbal communications: perhaps some shared experience, empathy, etc. We can fake a lot of things to push the human participant closer to the goal!
Mobility
- motors
- wheels
- chassis
- motor power
- motor control circuitry
- big battery
Drive motors: I now have my 12V 150RPM gearmotors from China
- simple test circuits with 12V battery and driver ICs
- Texas Instruments L293NE or Texas Instruments SN754410 (almost equivalent)
- useful searches L293NE or SN754410 PWM arduino
- http://itp.nyu.edu/physcomp/Labs/DCMotorControl
- http://www.ti.com/product/sn754410
- datasheet: http://www.sparkfun.com/datasheets/IC/SN754410.pdf
- PWM for speed control - a two motor library perhaps with feedback loop via rotary encoder?
- using PWM on 2 motors http://letsmakerobots.com/node/2074
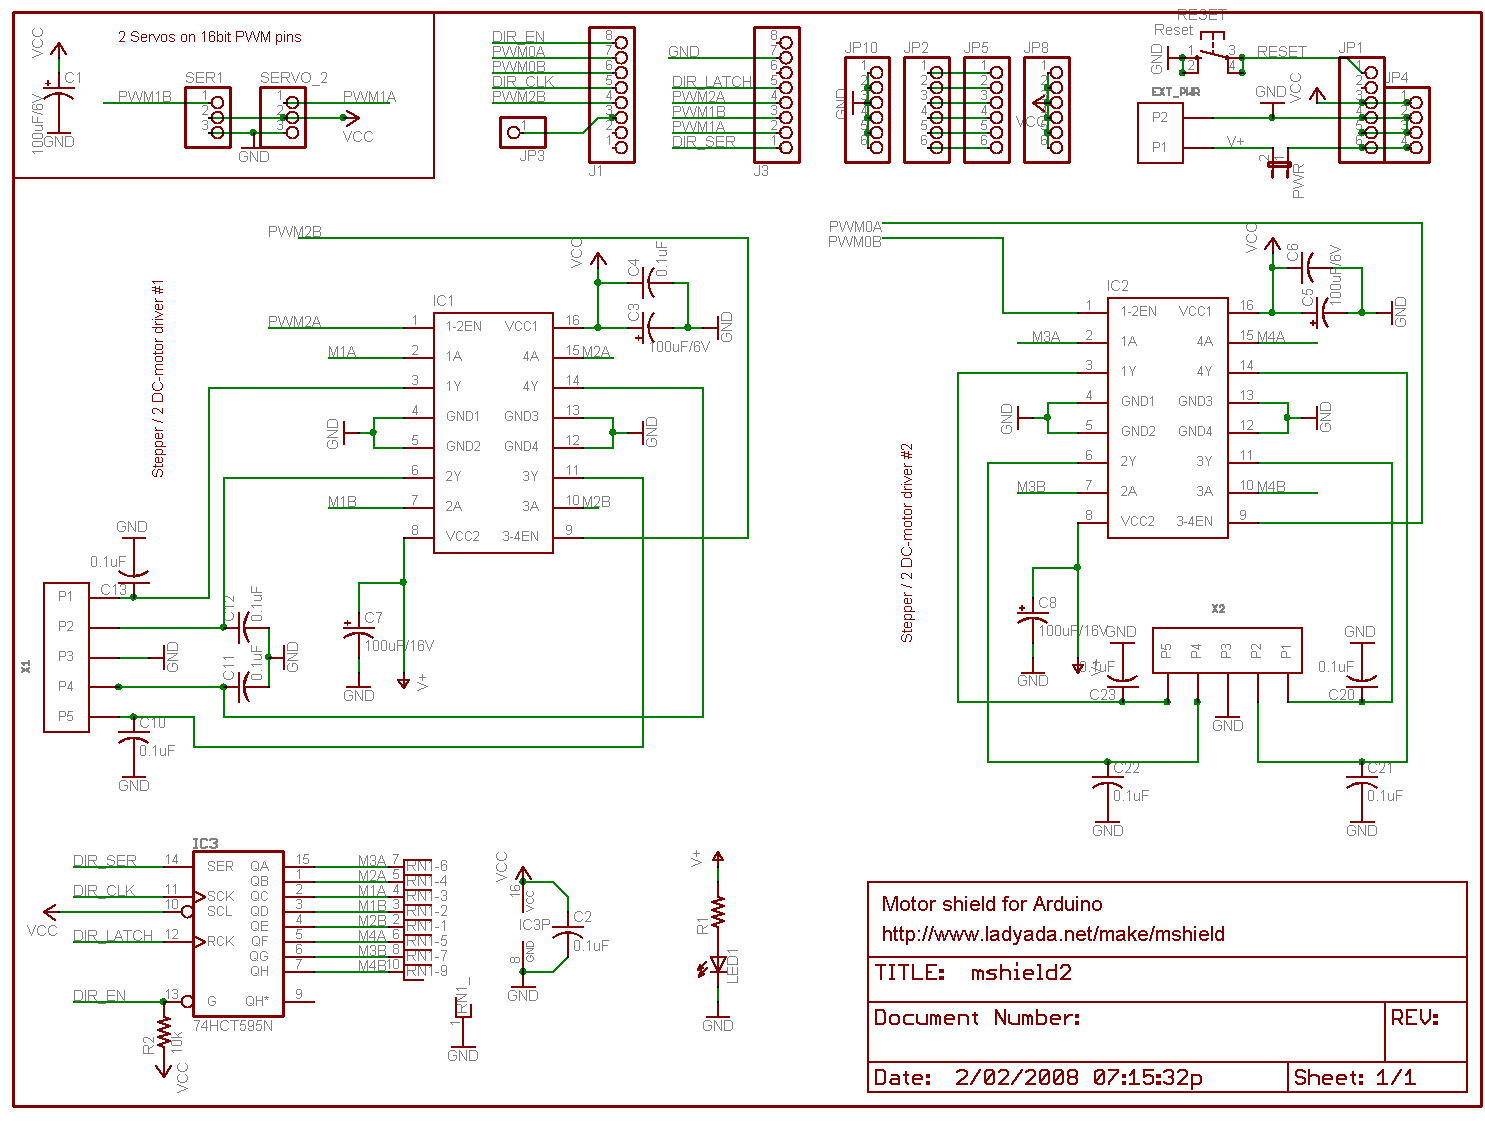
- Adafruit motor shield is a good example:
- http://www.adafruit.com/products/81
- http://www.ladyada.net/images/mshield/mshieldv1-schem.png
- My own custom motor shield for 2 DC motors
OK, motors tested with a two motor circuit...
This sketch is a munge of http://letsmakerobots.com/node/2074 and http://itp.nyu.edu/physcomp/Labs/DCMotorControl
Bodywork
- building the plastic chassis
- what's that display board plastic material called?
- is it http://www.foamcore.com/ultra-board.html
- milling the plastic - is nicely cut with a fine jigsaw blade - try router table!
- can it be laser cut? may contain chlorine or other nasties: see http://www.nycresistor.com/2008/08/28/how-to-identify-polymers-with-burnination/
- battery regulation: http://letsmakerobots.com/node/3880
- battery mounting - where?
- chassis strong enough to carry those batteries? !!!!
- aluminium cross bracing?
- perhaps move to 2x 6V - keep it flexible
- cylinder case mods
- speakers in mouth plate/grill
- side mount for MCU1 and support boards (temporary?)
- top for beacon - keep on side for now
- mounting of cylinder on chassis
- motor mountings
- simple aluminium angle mountings - might make some more of these with greater accuracy!
- motor to axle couplings
- building the wheels/axles/bearing hubs: nearly done - some tweaking and securing to do
Motor shaft couplings being the most annoying thing right now
- I really need some well made couplings like these
Small hose clips may be the thing.
Brains
The current design makes use of a few processors: the small cheap eeePC 701 4G netbook and a couple of inexpensive (£7) Xino Arduino micros.
MCU1 and MCU2
Xino devices
- power screw terminal blocks: http://uk.rs-online.com/web/p/products/4258720/
- smt caps for smt regulators!
MCU1 PIN usage summary table here on Google Docs
MCU1 software
- TODO motor drive code and motor drive commands from PC
eeePC mods
Hardware and system mods to support "isolated usage".
- soldered in an external power button cable
- PWR button sub-assembly with safety keyswitch - mount on side panel
- TODO LED in "Micro" and other nice illuminated buttons
- Monostable/bistable startup flasher circuit for "Micro" switch?
- "pizza box" container
- power port extension
- USB extension - USB hub - still powering MCU1 from USB - much drain?
- Lid switch: do not suspend when lid closed - instead just switch to external monitor output
- http://forum.eeeuser.com/viewtopic.php?pid=20450#p20450
- sudo nano /etc/acpi/lidbtn.sh
- Lid switch: do not suspend when lid closed - instead just switch to external monitor output
#!/bin/sh
LID_STATE=`cat /proc/acpi/button/lid/LID/state | awk '{print $2 }'`

if [ $LID_STATE = "closed" ] ; then
#    /etc/acpi/suspend2ram.sh
        /bin/su user -c "/usr/bin/xrandr --output VGA --mode 800x600 --output LVDS --off"
fi
if [ $LID_STATE = "open" ] ; then
        /bin/su user -c "/usr/bin/xrandr --output LVDS --preferred --output VGA --off"
fi
exit 0
This is not enough: the eeePC will not power on with the lid closed so I had to disable the lid closed sensor by removing the magnet from screen section of the case
- clean up and test external monitor output - not fully working with some of my external monitors
- removed EasyMode which "mostly" fixes the "are you sure" dialog for shutdown via power switch
- http://wiki.eeeuser.com/howto:useicewm#configuration_of_icewm
# minimal brightness
echo 0 > /sys/devices/platform/eeepc/backlight/eeepc/brightness"
# screen off after 2 minutes
xset dpms 0 0 120
eeePC problems
- unionfs inode depletion causing "No space left on device" but df shows plenty of space!
- http://forum.eeeuser.com/viewtopic.php?pid=537876#p537876
- mount /dev/sda2 elsewhere and remove the '.wh*' files
- running out of space due to other errors ~/.Xsession-errors
- firefox won't start - oh well!
eeePC Software
- console read and process
- speech module
- speech commands from stdin
- speech thread - busy flag and job queue management
- motor module
- motor control input from STDIN
- sensor module
- camera module - look at Java interaction with V4L or whatever is in use
- mic input - and speech recognition
- GUI interface port and GUI app
Additional
Range Sensors
- SRF05 by Devantech Ltd
Rotary Encoders for wheels
- an easily available "obsolete" ball type PS/2 mouse
- Microsoft "Mouse Port Compatible Mouse 2.0A"
- using the serial output from the mouse circuitry
- encoder usage in daylight
- mounting encoder wheel to axle