Inkscape
Installation
Inkscape is a brilliant tool for creating SVG files to later use for laser cutting. The download page shows you the installer files for your system; note for a slight increase of speed for complex files on 64bit systems use the Partha builds.
Setup
Grid Setup
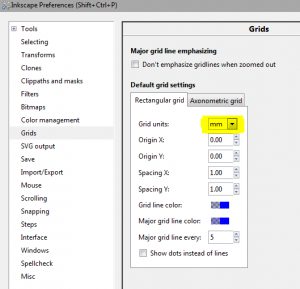
Inkscape by default works in pixels as the measurement; for the grids and page size. First of all to change the grids go to the Inkscape Preferences (File -> Inkscape Preferences), under the Grid section select "mm" instead of the default "px". This affects all new files, so select File -> New to open one, and go to View -> Grid to see it in action.

Document Settings and Templates
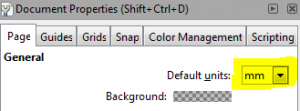
By default Inkscapes default file will be in pixels with an A4 portrait size. The easiest option to create one using millimetres is to select A4 Landscape from the New menu. You can also change a documents units setting any time under File -> Document Properties and selecting mm instead of px for the Default units.

You may also be interested in templates for various sizes of material. If you save these to your Inkscape templates folder (under Windows: %appdata%\inkscape\templates ) you can select them from the New menu. If you want to replace the default, rename one of them to "default.svg". This can save a lot of time when creating multiple items! These are all landscape, but you can save whatever basic SVG you want as a new template.
- Laser A4 template (Landscape, 297x210mm)
- Laser A3 template (Landscape, 420x297mm)
- Laser A2 template (Landscape, 594x420mm)
- Laser A1 template (Landscape, 841x594mm)
- Laser A0 template (Landscape, 1189x841mm)
- Laser 1200x900mm template (Landscape) - A0 isn't quite full bed size - note cutting area of the laser is not necessarily to each edge. This template might be required to line up large materials however.
Once your document is set to MM it will import accurately into Laser Cut 5.3.
Usage Tips
Some tips for usage, a full tutorial may come later:
Single Item, multiple copies?
Is it best to do it all in Inkscape and duplicate perfectly or leave it until you import a single item into Laser Cut? Both options are possibly the best;
- If you make an entire sheet of items, and Laser Cut detects the paths and joins them correctly, that may be more precise
- If you have an issue with importing items/joining edges, such as some overlapping, which need some manual adjustment for each individual one, importing one copy then duplicating it in Laser Cut may be preferable.
Easiest option is to make one, import into Laser Cut and see if it is a one-step process to get to your final design.
Coloured Paths
Inkscape colours are exported with the DXF which can be used to mark areas for engraving, different powers or even different orders of cut. Make sure to have the colours match across everything of one type however - using the primary colours along the bottom can help.
See the tutorials on Laser Cut for how to use this powerful feature.
Area fills and Layers
You can fill-colour in areas (eg; to show engraving areas) which makes things easier to see, and use layers and transparency to show/hide or overlay different areas. These are all collapsed or ignored when exporting to DXF, which is useful.
Area fill colour also helps determine if a path you've created is really a completed one. A good engrave area is a fully contiguous single line which is joined up to itself, although the DXF export splits the continuous line into one line with two end points which is easily fixed in Laser Cut.
Paths only!
When finishing a file ready to export select the entire document and go to Path -> Object to Path. The only thing a laser understands is paths (lines) and this may catch any you missed if converting an image file over; objects are not supported.
You can leave mess in
You can leave in the SVG embedded images (eg; jpegs you are tracing) and the DXF file will simply exclude them when it is created. You can check the import in the Laser Cut demo or by opening the DXF file again with Inkscape.
DXF file export settings
You must save what you want in the DXF file format. This format is not as reliable to re-edit so keeping the original SVG is recommended, use File -> Save As Copy to do an "export" to DXF:

The DXF file exports:
- Paths (lines created in your file)
- Colours of paths
It will exclude:
- Embedded images
- Layers
- Transparencies
- Fills
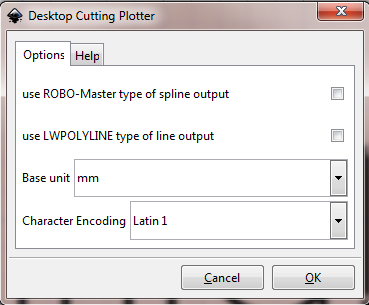
The save options can also help! It must be set to mm, and the tickboxes vary the output. This is a best default set:

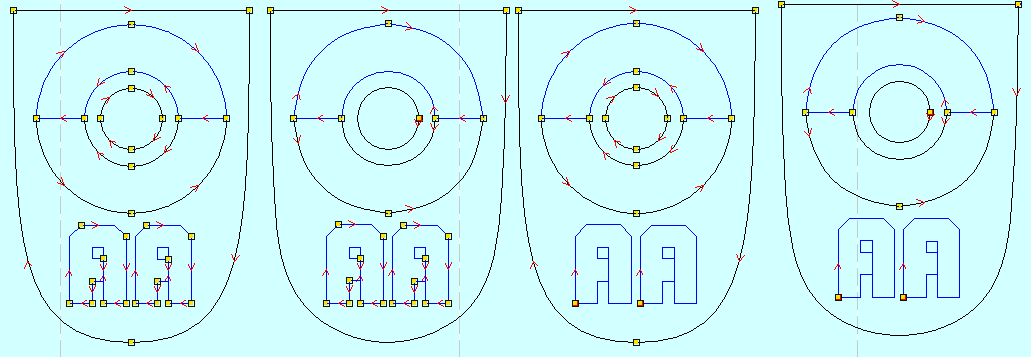
The two tickboxes affect how the different paths of the file are split on save. If you've joined up all relevant sections as I had in this file which includes straight lines and curves, the two tickboxes together work a lot better:

From left to right:
- No tickboxes - all paths are split (note that this may allow the laser to determine the quickest cutting path better).
- ROBO-MASTER ticked - the splines (curved lines) are not split, straight lines are.
- LWPOLYLINE ticked - the straight lines in the A's are not split anymore. In fact the A was created by a long use of the polygon tool in Inkscape and connected together at the end point and imported over perfectly.
- Both ticked - both the above occur. It isn't perfect (the curves are not joined to the straight lines even though they are in Inkscape!) but it saves a lot of messing around. Use this if possible.