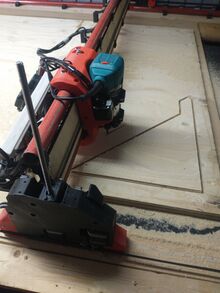
"RatRider" V1E LowRider V4
| "RatRider" | |
|---|---|
 | |
| Primary Contact | AJ |
| Created | 02/2025 |
| Status | Ongoing |
| Type | Members Project |
I have access to a lot of "scrap" plywood from work, and I just can't make stuff out of it fast enough. Or good enough, I'm not very good at woodwork. One thing led to another and so, obviously, I built a machine to do the woodwork for me.
The Build
I've built the "Lowrider" V4 design from Ryan at V1 Engineering which is awesome and has a really strong community and documentation. Super well thought out, and you can build it to a size that suits the available space. Or do what I did, which is build it to be able to chew up a full 8x4ft sheet in one job, and then have to expand your shed to put it in! Months of effort and love have been put into the design and it really shows. Ryan quotes the cost to build the machine as sub $800 and much less if you print the printed bits yourself. In my case, because I had steppers, leadscrews and control boards etc laying around the cost came in at sub £400. Including buying tooling. Absolutely mad for the capability it has! Mine is dubbed the "RatRider" because it is, as with everything I make, a minimum viable product recycling as much from the parts bin as possible.
-
Build underway!
-
Minimum viable frame assembled
-
Why is drawing with a computer SO much cooler than printing?
Parts
The majority of the machine is 3d printed - almost 3 kilos of PLA parts! I did the printing on my trusty Prusa MK2.5 in el cheapo PLA - preferred over PETG in this application for the greater rigidity. The Z axis uses linear rail and leadscrews very much like many 3d printers. The X and Y are belt drive and run 608 bearings on 30mm/32mm steel tube for constraint. The Y axis runs on a single tube, the X is a "beam" that spans the two Y carriages with two tubes and some flat stock "strut plates" that sit into 3d printed braces. The "core" that sits on this beam and holds the X motor and router is one of the biggest 3d prints I've ever done, and an absolutely gorgeous piece of design work I can barely even appreciate. The strut plates I made on the Laser Cutter in 5mm ply, though because I needed slightly more than 4ft wide ones I had to make each plate in two halves - you can alternatively 3d print some temporary plates and use the machine to cut it's own struts.
I also initially made the end plates that join the Y carriages to the Z beam on the laser in 5mm ply, but the machine couldn't lift it's Z axis without assistance. So I've milled some out of 5mm alu on the Superbox CNC Router - the design calls for 1/4" aluminium so 5mm may still be a little too bendy, time will tell.
I used a Trigorilla control board and stepper motors out of a really broken Anycubic Chiron. I also used the belts from this machine for the X belt, but I had to order in belts for the Y axes because they're so long. Leadscrews are also recycled, linear rail I had to buy (turns out I had some all along, oh well).
My build thread on the V1E forums (where I share my various mistakes along the way) is here: https://forum.v1e.com/t/ratrider-lr4-build-in-the-uk/48329.
If I can build it, you can too (and if you do, feel free to pick my brain!)
What Not To Do
| Fail | Cause | Fix |
|---|---|---|
| Core moving rough | (Badly) painted rails | DO NOT do that. Sandpaper & swearing. |
| Endstops not triggering | Cheap endstops NO only, not NC D: | Temp: Invert in Firmware. Soon: Swap to NC endstops |
| All axes moving too far | Trigorilla board hardcoded to 1/16th Microstepping, not 1/32 | Temp: Halve steps per mm in firmware. Soon: Jackpot! |
| Y axes moving different distances | Mismatched Y motors, 20T pulley on one Y motor | Don’t do that, ya goof! |
| Y endstops not triggering | Levers weren’t long enough | Temp: Extend levers Soon: Replace |
| X endstop not triggering | Little lever broken off after assembly somehow. Oops. | Temp: Tiny stop block added for it to hit against. Soon: Swap out for new |
| Y badly out of square | User awful at making things square | Do better. Moved Y1 belt relative to Y0 which took the error down from 4cm to 1cm. Still the wrong order of magnitude but I’ll get there. |
| Z0 missing steps when trying to climb | TBD |
Things I've Made With It
- 45degree "wedge" stands for 55" displays
- Lots and lots and LOTS of sawdust
What's Next
- Dust extraction (it's in the design, I left it off to get up and running as quick as possible)
- Fit the new alu strut plates
- Make a table that's not completely terrible
- Swap from a Marlin board to a the "Jackpot" FluidNC board and remove some of the rats from the wiring
- LED tape under the beam for some sweet underglow


