Help:Uploading images
- See also: Help:Contents and Help:Images (adding to pages)
This page explains how to upload images to this wiki. We upload images to the wiki so they can be embedded in wiki pages.
Uploading a single image
You can upload images one-at-a-time on the Special:Upload page:
- On the left-hand sidebar, under “toolbox”, click “Upload file.”
- Select the “Source filename”
- Fill in the optional “Summary” text.
Adding information about the image
If you upload an image with a name like "DSC0013424.JPG", then please choose a more meaningful Destination filename on the upload page, as it makes linking to the image easier.
A description, license information and categories can be added in the summary (it can be update late by going to image page and clicking edit). Example summary in wiki markup:
==Summary==

'''Source:''' https://en.wikipedia.org/wiki/File:Cat_silhouette.svg

'''Licence''' [[wikipedia:Public domain]]

[[Category:Design and graphics]]
SVG files
Sometimes SVG vector files don't render correctly, for example they are blurred or have the wrong background. They can be edited using Inkscape. The absolute size of the image has an effect (as measured in the image's set units), as does its relative size to the image's set document border.
Sometimes 'cleaning' the cruft from the image can help. This can be done with the online tool SVGminify.com (keep a copy of the original file).
As a last resort the SVG can be converted to a bitmap PNG/JPEG file at an appropriate resolution and then uploaded to the wiki.
Uploading a set of images

Installing Commonist
The program Commonist can be used to upload a whole batch of images. You can set it up as follows:
- 1) Install Commonist by following installation instructions for your operating system, as shown here.
- (Warning: the 'Easiest way' highlighted in those instructions (using .JNLP) will not work! You must install the program to your computer. Save the commonist.zip, unpack it, to execute file
./commonist(on Linux or mac os x), or.\commonist.bat(on windows).
- (Warning: the 'Easiest way' highlighted in those instructions (using .JNLP) will not work! You must install the program to your computer. Save the commonist.zip, unpack it, to execute file
- 2) Now to add Nottinghack Wiki. Open the
wikis.txtfile, or create if it does not exist. It is located at~/.commonist/wikis.txt(Linux or mac) orC:\Users\t\Desktop\commonist-x.x.x-src\src\main\resources(Windows) - 3) Add the following line of text to the 'wikis.txt' file:
nottinghack _ https://wiki.nottinghack.org.uk/api.php
- 4) Now you can run Commonist and select 'nottinghack' in the list of Wikis. Execute
./commonist(on Linux or mac os x), or.\commonist.bat(on windows).
Using Commonist
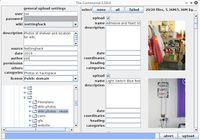
Commonist uses a intuitive GUI. Enter your Nottinghack credentials and select Nottinghack Wiki. The file browsing pane allows you to select a directory. On the right hand side tick the photos in the directory to upload, specific details can be add. The information on the left will be add to all the uploaded photo pages.
Flickr
See how to embed a flickr gallery in a wiki page (defunct as of December 2019).