Vacuum Cleaners: Difference between revisions
mNo edit summary |
Move to correct place |
||
| (14 intermediate revisions by 3 users not shown) | |||
| Line 1: | Line 1: | ||
{{archive|date=29th April 2024|reason=Very out of date.}} | |||
{{draft}} | |||
== Henry == | == Henry == | ||
| Line 5: | Line 8: | ||
[[File:WVac-Henry.JPG|Henry]] | [[File:WVac-Henry.JPG|Henry]] | ||
Good suction,easy to empty and clean, useful for clearing general workshop waste (e.g. saw chippings | Good suction,easy to empty and clean, useful for clearing general workshop waste (e.g. saw dust and chippings). Has a particularly long cable on a built-in reel, so is the best choice for a quick once-'round-the-workshop clean up. | ||
[[File:HenryFull2_w.jpg|Henry with a full tummy]] | |||
Henry looks plump, but actually doesn't have a very large tummy. As a result he often gets painfully full, gets overheated and stops doing his job properly. Don't let him suffer in this state - empty him into a bin in the dusty area. | |||
== Kerstar == | == Kerstar == | ||
| Line 21: | Line 28: | ||
== Hoover Shop Vac == | == Hoover Shop Vac == | ||
Greeney-Grey in colour this is an antique, but still works well and has the advantage of accommodating larger hoses, such as will fit on the router table. | Greeney-Grey in colour this is an antique, but still works well and has the advantage of accommodating larger hoses, such as will fit on the router table. It uses a cylindrical cartridge filter than needs accumulated sawdust clearing out when the bin is emptied - messy, but shows how much dust it is keeping out of the air. | ||
[[File:WVacuumHooverShopVac.JPG|Hoover]] | [[File:WVacuumHooverShopVac.JPG|Hoover]] | ||
| Line 27: | Line 34: | ||
== Dyson Upright == | == Dyson Upright == | ||
Purple beast lives in the blue room as that is where | Purple beast lives in the blue room as that is where there is the most carpet needing cleaning. | ||
== Big Blue == | |||
Nilfisk workshop vacuum for use in the dusty area with sanding tools. It has a power socket which these can be plugged into, and the vacuum then switches on whenever the tool is running. Needs a set of adaptors for the various sanders buying / fabricating. | |||
== Henry the Second == | |||
Donated, more recent model with high/low power switching. This one uses a bag, and seems to be less powerful than the original Henry. Lives under the metalworking bench. | |||
== Titan == | |||
There are replacement bags in the [[Toilets]], under the window. | |||
The Titan in the Studio, ''Hyperion'', does not have any compatible attachments nearby. You're stuck with the spot cleaning tool that it is equipped with. | |||
== Others == | == Others == | ||
Small cylinder-type bagless vacuums of varying quality are attached to some tools. These all need to be checked regularly to make sure they don't become too full. | Small cylinder-type bagless vacuums of varying quality are attached to some tools. These all need to be checked regularly to make sure they don't become too full. | ||
== Emptying and cleaning instructions == | |||
In all cases, it is a good idea to have a mostly-empty dustbin with liner ready to receive the waste. | |||
=== Kerstar === | |||
Release the clips holding the motor to the top of the canister and put to one side. Lift next layer with the stocking-filter up from the canister, shaking / brushing dust from this into the canister, then put this part aside. Empty the canister contents into a dustbin. | |||
Before re-assembling, check that the stocking filter is held in place with an elastic band holding the top securely over the Velcro (it can come loose if brushed clean too enthusiastically). | |||
Replace the filter layer back over the canister, with the scourer filter over the central hole, then put the motor top back - align it so that the switch is to the rear away from the hose port. Re-secure the clips. | |||
=== Henries === | |||
=== Dyson Upright === | |||
=== Dyson (table saw) === | |||
=== Hoover === | |||
Release clips holding the motor top onto the canister. Take this to a dustbin and hold well down inside the bin and use a handbrush to clean the filter by gently stroking the brush along the corrugations. Don't be over-energetic, and try and keep the operation within the bin - otherwise it can be very messy. | |||
When the filter has been cleaned, tip the contents of the canister into the bin and replace the motor / filter on top of the canister. Re-secure with the clips making sure that the switch is to the rear away from the hose inlet. | |||
[[Category:Infrastructure]] | [[Category:Infrastructure]] | ||
Latest revision as of 20:48, 1 May 2024
| The information on this page is NOT current. It retained for historical or archival purposes only. (29th April 2024) |
| This page is a draft and is probably being actively worked on. Feel free to contribute, or make suggestions on the talk page. However, be aware that details are subject to change. (This page was last edited 1 May 2024 @ 20:48 GMT) |
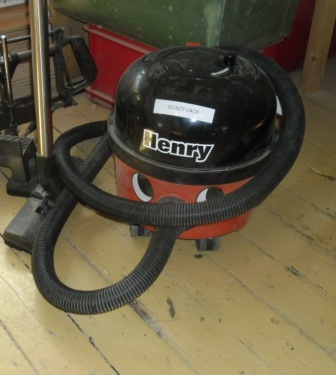
Henry
Red tub vacuum, usually lives in the workshop area.
Good suction,easy to empty and clean, useful for clearing general workshop waste (e.g. saw dust and chippings). Has a particularly long cable on a built-in reel, so is the best choice for a quick once-'round-the-workshop clean up.
Henry looks plump, but actually doesn't have a very large tummy. As a result he often gets painfully full, gets overheated and stops doing his job properly. Don't let him suffer in this state - empty him into a bin in the dusty area.
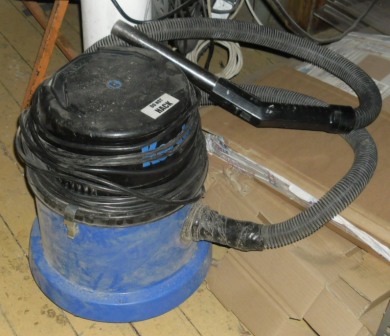
Kerstar
Blue tub vacuum, usually lives somewhere near the dusty area.
Large capacity and good suction, but this drops off when the tub becomes over full. Not quite as easy as Henry to clean out - there is a filter sock over a frame which needs to be fitted carefully to prevent dust passing straight through the motor.
OrangeVAX
Another tub, this one dedicated (at present) to the bench-top bandsaw.
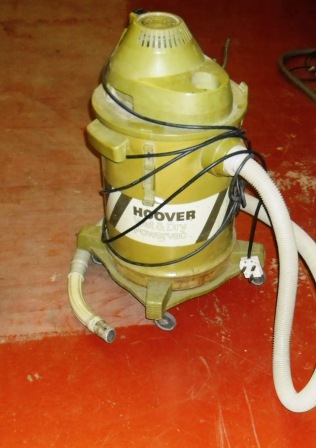
Hoover Shop Vac
Greeney-Grey in colour this is an antique, but still works well and has the advantage of accommodating larger hoses, such as will fit on the router table. It uses a cylindrical cartridge filter than needs accumulated sawdust clearing out when the bin is emptied - messy, but shows how much dust it is keeping out of the air.
Dyson Upright
Purple beast lives in the blue room as that is where there is the most carpet needing cleaning.
Big Blue
Nilfisk workshop vacuum for use in the dusty area with sanding tools. It has a power socket which these can be plugged into, and the vacuum then switches on whenever the tool is running. Needs a set of adaptors for the various sanders buying / fabricating.
Henry the Second
Donated, more recent model with high/low power switching. This one uses a bag, and seems to be less powerful than the original Henry. Lives under the metalworking bench.
Titan
There are replacement bags in the Toilets, under the window.
The Titan in the Studio, Hyperion, does not have any compatible attachments nearby. You're stuck with the spot cleaning tool that it is equipped with.
Others
Small cylinder-type bagless vacuums of varying quality are attached to some tools. These all need to be checked regularly to make sure they don't become too full.
Emptying and cleaning instructions
In all cases, it is a good idea to have a mostly-empty dustbin with liner ready to receive the waste.
Kerstar
Release the clips holding the motor to the top of the canister and put to one side. Lift next layer with the stocking-filter up from the canister, shaking / brushing dust from this into the canister, then put this part aside. Empty the canister contents into a dustbin.
Before re-assembling, check that the stocking filter is held in place with an elastic band holding the top securely over the Velcro (it can come loose if brushed clean too enthusiastically).
Replace the filter layer back over the canister, with the scourer filter over the central hole, then put the motor top back - align it so that the switch is to the rear away from the hose port. Re-secure the clips.
Henries
Dyson Upright
Dyson (table saw)
Hoover
Release clips holding the motor top onto the canister. Take this to a dustbin and hold well down inside the bin and use a handbrush to clean the filter by gently stroking the brush along the corrugations. Don't be over-energetic, and try and keep the operation within the bin - otherwise it can be very messy.
When the filter has been cleaned, tip the contents of the canister into the bin and replace the motor / filter on top of the canister. Re-secure with the clips making sure that the switch is to the rear away from the hose inlet.


