Anycubic Photon: Difference between revisions
+PDF |
+fix link |
||
| Line 25: | Line 25: | ||
Always wear gloves when handling the resin and resulting prints. Gloves are available and if none are look upstairs in the safety area. | Always wear gloves when handling the resin and resulting prints. Gloves are available and if none are look upstairs in the safety area. | ||
The [[ | The [[Media:ANYCUBIC Photon User Manual English 20171229.pdf|manual]] is available for download. It contains a guide to how to setup and use the printer and some basic guidance on the software and settings to use for prints. | ||
=== Designing === | === Designing === | ||
Revision as of 21:10, 13 November 2019
| This tool requires induction. Please request via HMS. Note, induction costs £20. |
| Anycubic Photon | |
|---|---|
 | |
| Manufacturer | Anycubic |
| Model | Photon |
| Obtained | Pledge drive (August 2019) |
| Location | CNC Area |
| Team | 3D Printing |
| Induction Required | Yes (use request form) |
| Booking | Yes (use HMS) |
| Tools: all pages • list • Power Tools • Broken tools {{}} | |
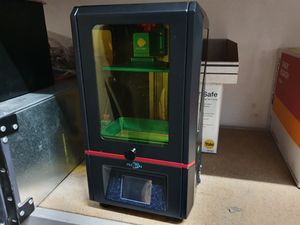
The Anycubic Photon is a resin based SLA 3D Printer. It produces higher definition models than typical filament based printers (such as the filament based Ultimaker Original+). It was purchased in August 2019 via a Pledge drive.
The printer is located in the CNC Area.
Booking the Printer
You can book the printer for one 6 hour maximum period at once. Be aware that some prints can take several hours so be careful when timing it.
Basic Operation
Always wear gloves when handling the resin and resulting prints. Gloves are available and if none are look upstairs in the safety area.
The manual is available for download. It contains a guide to how to setup and use the printer and some basic guidance on the software and settings to use for prints.
Designing
You first of all design your 3d print on your own computer or one in the Blue Room using suitable software such as ChiTuBox which supports Windows, Mac and Linux.
You can also use the slicer provided by Photo called Anycubic Photo Slicer (downloads available on the AnyCubic website for Windows and Mac). This however cannot open sliced models while ChiTuBox can.
The settings for the print should be tailored within the specifications below. Experimenting is key.
Printing
To print first use your RFID to active the printer. You can upload the finished design via. memory stick - one is with the machine to use if you don't have one yourself.
The prints done it in can take several hours - the height will affect the builds the most (a larger layer thickness tends to need a higher amount of time per layer to cure). Different types of resin may have different setting to use due to opacity and other reasons.
Due to the nature of the machine you may not see a failed print for 30mm or so depth unless it is paused and you move it (you shouldn't usually do this). For long prints if you are unsure it will go well book extra time to cover reprinting if it fails the first time.
Finished Parts
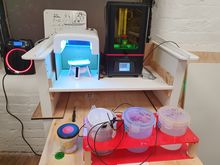
Printed parts need to be washed. There is available IPA for rinsing and water for removing the IPA.
Curing Station
A UV Nail Lamp is available to cure the finished print. It automatically rotates when turned on since the turntable is solar powered.
Specs
Resin

Resin typically costs: £20/500ml, plus wastage.
Videos
- Unboxing And Testing The Anycubic Photon 3D Printer (YouTube)
- Anycubic Photon – Ultimate detail 3D printing (YouTube)
- Anycubic Photon DLP 3D printer Review - insane print quality! (YouTube)
- ANYCUBIC Photon: How to Clean Resin Vat after Printing? (YouTube)
- Resin 3D Printing Safety - Important for Beginners! (YouTube)
