Arduino Due
| Arduino Due | |
|---|---|
| Primary Contact | Michael Erskine |
| Created | 2013-08-12 |
| Status | prototyping |
| QR code | |
The new Arduino Due board is the first Arduino to be based on an ARM Coretex M3 micro (rather than the usual AVR micro). This is still an Atmel chip but it will have more in common with the Mbed, LPCXpresso, etc. At time of writing I am still yet to receive my first Due board but I'm reliably informed that it's in the post!
So what is all the fuss about? Did you even notice any fuss? Well, it's a move away from the old AVR architecture and into a bigger arena. ARM is massive! What we, as Arduino users, get is an Arduino with a shed load more speed, and capacity. There are some potential downsides in the area of legacy Arduino convenience (e.g. the 3.3v logic) but these are small problems for those who appreciate the extra power.
Useful links in these early days:-
- http://arduino.cc/en/Main/ArduinoBoardDue
- Due Arduino forum: http://arduino.cc/forum/index.php/board,87.0.html
- Atmel's ARM page: http://www.atmel.com/arm/?sf13808117=1
- CMCIS standard for ARM Coretex: http://www.arm.com/products/processors/cortex-m/cortex-microcontroller-software-interface-standard.php
- BOSSA: http://www.shumatech.com/web/products/bossa
- Teensy 3 and Due: http://rcarduino.blogspot.fi/2012/09/arduino-due.html
This handy comparison table is from one of the sites above - not sure of the origin but I know that the 250k EEPROM for the Due is wrong as it doesn't have any!
|
|
Arduino UNO |
Arduino Mega |
Arduino Due |
|
MCU |
ATMega 328 |
ATMega 2560 |
AT91SAM3X8E |
|
Architecture |
8 bit AVR |
8 bit AVR |
32 bit ARM Cortex M3 |
|
CPU Speed |
16Mhz |
16Mhz |
84 Mhz |
|
Flash Memory |
32K |
256K |
512K |
|
RAM |
2K |
8K |
96K |
|
EEPROM |
1K |
4K |
250K |
|
Digital Pins |
14 |
54 |
54 |
|
PWM Pins |
6 |
15 |
16 |
|
AnalogInputs |
6 |
16 |
12 |
|
DAC |
0 |
0 |
2 |
First Due Arrived
OK, Aug 15th 2013, and I've got my first Due clone: a nice red SainSmart Due (http://www.sainsmart.com/sainsmart-due-atmel-sam3x8e-arm-cortex-m3-board.html) for the bargain price of £25 (a UK ebay seller).
- Due with Mega
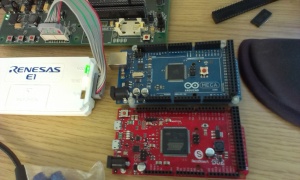
alongside Arduino Mega R3 and Renesas RSK+RX63N
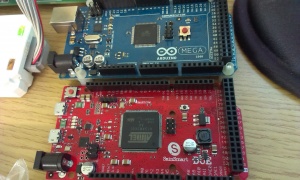
alongside Arduino Mega R3


Pinout diagram: http://forum.arduino.cc/index.php?topic=132130.0

New Magic
The main new magic is a pair of USB sockets: "programming port" and "native port". We also have an "erase" button which looks scary!
I first set up the Arduino 1.5.2 zip install onto a Windows XP machine and had a jolly old time with the various CDC serial port drivers! After a while everything was pretty nice using the programming port for uploading code and running a small command terminal. I had to employ the while(!Serial); technique to get a reliable startup of my code.
There is a 12-bit DAC onboard and there are exciting new projects that demonstrate impressing WAV audio output. Combined with the 3.3v voltages for cheap SD card interfacing, we have a simple means for adding good quality audio to our projects.
SD card success
I have just enjoyed a success with a direct SPI SD card interface...
Use a freshly formatted SD for best performance.
Type any character to start
Free RAM: 95419
Type is FAT32
File size 5MB
Buffer size 100 bytes
Starting write test.  Please wait up to a minute
Write 109.39 KB/sec
Maximum latency: 345932 usec, Minimum Latency: 8 usec, Avg Latency: 912 usec

Starting read test.  Please wait up to a minute
Read 975.80 KB/sec
Maximum latency: 982 usec, Minimum Latency: 7 usec, Avg Latency: 100 usec

Done

Type any character to start
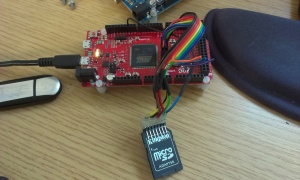
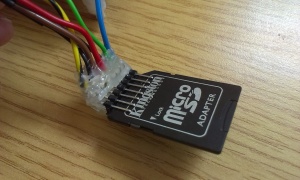
This uses a beta of the SdFat library as per http://forum.arduino.cc/index.php?topic=135439.0 connecting as shown using the SPI port and a single slave select pin (on digital 10). The SD card happens to be a 4Gb Transcend micro SD in a Kingston adapter. I made the cable from a PC motherboard connector I found at the hackspace.
- Due minimal SD card
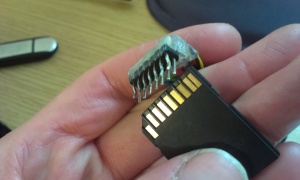
"socket" made from a double-row of 90 degree male header pins
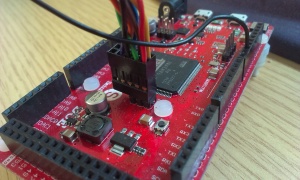
SPI/ICSP 6-pin connection
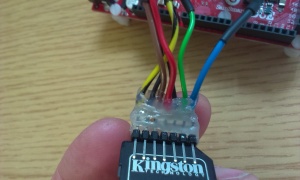
plenty of hot-melt
wires
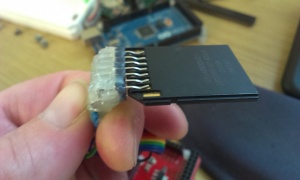
bend on connector pins
top row of pins just hold the card


Next: port http://arduino.cc/en/Tutorial/SimpleAudioPlayer to use SdFat beta
High Speed Timer - Coretex SysTick
// SysTick example by stimmer
// Slightly modified by msemtd

void setup() {
  Serial.begin(115200);
}

void loop() {

  int r=random(200);
  int v=SysTick->VAL;
  int a;
  delayMicroseconds(r);
  v=v-SysTick->VAL;
  if(v<0)v+=84000;
  Serial.print("delayMicroseconds(");
  Serial.print(r);
  Serial.print(") took ");
  Serial.print(v);
  Serial.print(" clock ticks, which when divided by 84 equals ");
  a = v/84;
  Serial.print(a);
  if(a != r){
    Serial.println(" -- FAILED!!!!!!!!!!!!");
  } else {
    Serial.println(" -- ok");
  }
  delay(500);

}