Difference between revisions of "Spider Geocache"
(Created page with "{{Project |image=File:Spider Geocache Assembly 2.jpg |name=Spider Geocache |primary=Danspencer101 |created=17/03/2019 |completeddate= |dormantdate= |ver...") |
m |
||
| Line 17: | Line 17: | ||
==Modelling== | ==Modelling== | ||
| − | [[File:Spider Geocache Model.gif|thumbnail|right]] | + | [[File:Spider Geocache Model.gif|thumbnail|right|3D Model]] |
The cache is based upon a spider model that I found on thingiverse. I originally printed this without the base but got reports that the leg snapped off after it being outside for less than a week so decided to add it in. I was also struggling with the legs detaching from the bed due to poor adhesion; the base solved this problem. | The cache is based upon a spider model that I found on thingiverse. I originally printed this without the base but got reports that the leg snapped off after it being outside for less than a week so decided to add it in. I was also struggling with the legs detaching from the bed due to poor adhesion; the base solved this problem. | ||
Revision as of 18:07, 17 March 2019
| Spider Geocache | |
|---|---|
 | |
| Primary Contact | Danspencer101 |
| Created | 17/03/2019 |
| Status | In Progress |
| Type | Members Project |
| QR code | |
This geocache is a 3D printed cache to replace one that went missing on a trail I maintain in Derby. The waterproof part that will hold the log sheet is a 1.2ml phial so it will be classed as a micro cache.
Modelling

The cache is based upon a spider model that I found on thingiverse. I originally printed this without the base but got reports that the leg snapped off after it being outside for less than a week so decided to add it in. I was also struggling with the legs detaching from the bed due to poor adhesion; the base solved this problem.
I modified the STL file by putting a hole on the underside to press fit the Phial into and added a base that strengthens the spiders legs.
3D Print
Printed on my Creality CR-10s at home overnight simply because it took about 9hrs to print and I didn't want to stay with our 3D Printer for that length of time.
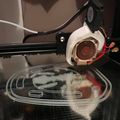
First Layer
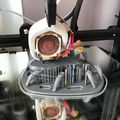
Halfway through


Assembly
I removed the supports & press fitted the phial into the hole with a drop of super glue to lock it in place.
In addition I put a dab of super glue on to the foot of each leg to further strengthen the weak point.
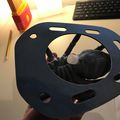
Push fit the container
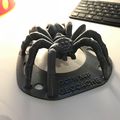
Drop of glue on each leg

Paint
I will paint the base plate at the bottom green or something to blend in with the ground and will paint the spider black.