Thicknesser: Difference between revisions
m →Setting Up: Styling |
|||
| (9 intermediate revisions by 3 users not shown) | |||
| Line 3: | Line 3: | ||
|manufacturer=Axminster | |manufacturer=Axminster | ||
|model=CC10T | |model=CC10T | ||
|obtained= | |obtained= Acquired <!-- method obtained, ie. donated/purchased etc. --> | ||
|obtaineddate= | |obtaineddate= May 2019 | ||
|location=Dusty Area | |location=Dusty Area | ||
|team=Woodworking | |team=Woodworking | ||
| Line 18: | Line 18: | ||
==Safety== | ==Safety== | ||
[[File:Axminster-cc10t-thicknesser-rear.jpeg|200px|thumb|right]] | |||
The major hazard is having loose clothing or fingers pulled into the rotating blades, the antikickback mechanism will stop anything entering the thicknesser from being pulled free. | The major hazard is having loose clothing or fingers pulled into the rotating blades, the antikickback mechanism will stop anything entering the thicknesser from being pulled free. | ||
Wear hearing, eye protection and a dust mask in use | '''Do not wear any loose clothing, feel free to stop anyone using the tool with baggy sleeves or jumpers, hoodies with tassels or drawstrings.''' | ||
Wear hearing, eye protection and a dust mask in use. | |||
It is essential to connect the exhaust port to one of the vacuum dust collectors available in the workshop. | |||
Make provision for supporting the work as it passes through the machine, either a workmate to collect the timber on the far side or outfeed supports. | Make provision for supporting the work as it passes through the machine, either a workmate to collect the timber on the far side or outfeed supports. | ||
| Line 35: | Line 41: | ||
==Storage== | ==Storage== | ||
The unit is kept under the wheeled purpose-built cart, the cart has four locking casters for stability. and the whole thing can be stowed under the bench. | The unit is kept under the wheeled purpose-built cart, the cart has four locking casters for stability. and the whole thing can be stowed under the bench. | ||
<gallery mode=packed-hover heights=250px style="text-align:left"> | |||
Yellow Thicknesser.jpg|Thicknesser cart | |||
</gallery> | |||
The Thicknesser has two recessed lifting handles on either end, it is very heavy. | The Thicknesser has two recessed lifting handles on either end, it is very heavy. | ||
==Setting Up== | ==Setting Up== | ||
Move to a safe working area where there is room for infeed and outfeed and you can easily move around the machine to feed and retrieve your work while processing. | Move to a safe working area where there is room for infeed and outfeed and you can easily move around the machine to feed and retrieve your work while processing. '''Lock the castors.''' | ||
Shuffle the unit from its storage cart until grab handles are accessible and lift onto the top surface. | Shuffle the unit from its storage cart until grab handles are accessible and lift onto the top surface. | ||
''' | <gallery mode=packed-hover heights=250px style="text-align:left"> | ||
Thicknesser_bolt.jpg|Securing bolt | |||
</gallery> | |||
'''Ensure the tool is secure by dropping the four M8 bolts through the holes in the frame and cart.''' Do not remove the bolts. | |||
Detailed operating instruction in the manual, see above. | Detailed operating instruction in the manual, see above. | ||
Latest revision as of 17:31, 21 August 2024
| Thicknesser | |
|---|---|
 | |
| Manufacturer | Axminster |
| Model | CC10T |
| Obtained | Acquired (May 2019) |
| Location | Dusty Area |
| Team | Woodworking |
| Induction Required | No |
| Tools: all pages • list • Power Tools • Broken tools {{}} | |
The Space has an Axminster CC10T Thicknesser, located in the Dusty Area. It is NOT an induction tool. It is available to all members.
Manual
Safety

The major hazard is having loose clothing or fingers pulled into the rotating blades, the antikickback mechanism will stop anything entering the thicknesser from being pulled free.
Do not wear any loose clothing, feel free to stop anyone using the tool with baggy sleeves or jumpers, hoodies with tassels or drawstrings.
Wear hearing, eye protection and a dust mask in use.
It is essential to connect the exhaust port to one of the vacuum dust collectors available in the workshop.
Make provision for supporting the work as it passes through the machine, either a workmate to collect the timber on the far side or outfeed supports.
Reclaimed Timber
Buried nails, grit, glass shards or anything sharp will permanently damage the blades. Please ensure that timber is free from all such debris before using the thicknesser with it. However members can use it to refresh pallet wood and old floor boards. Please be aware that the woodworking team will not sharpen/ replace the blades if they suffer damage from nails etc. If your work requires a good blade then use the main planer /thicknesser. The blades on this induction machine receive more care and attention.
Operation
Set the blade height with the top handle, feed in the timber from the feed side (note the depth gauge) KEEP HANDS AWAY FROM THE MOUTH OF THE TOOL. if work becomes trapped, switch off, alow the motor the stop raise the blade such the work can be safely removed.
Storage
The unit is kept under the wheeled purpose-built cart, the cart has four locking casters for stability. and the whole thing can be stowed under the bench.
-
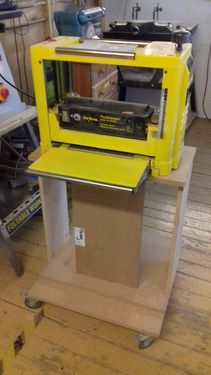 Thicknesser cart

The Thicknesser has two recessed lifting handles on either end, it is very heavy.
Setting Up
Move to a safe working area where there is room for infeed and outfeed and you can easily move around the machine to feed and retrieve your work while processing. Lock the castors.
Shuffle the unit from its storage cart until grab handles are accessible and lift onto the top surface.
-
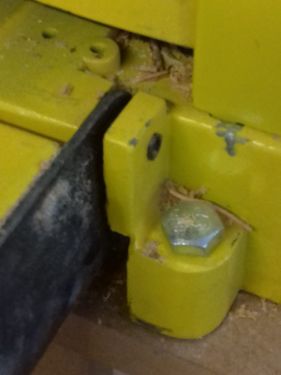 Securing bolt

Ensure the tool is secure by dropping the four M8 bolts through the holes in the frame and cart. Do not remove the bolts.
Detailed operating instruction in the manual, see above.