Planer Thicknesser
| Planer Thicknesser | |
|---|---|
 | |
| Manufacturer | ELU |
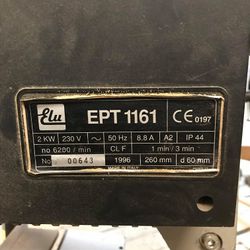
| Model | EPT 1161 |
| Obtained | Long Term Loan (November 2015) |
| Location | Dusty Area |
| Team | Woodworking |
| Induction Required | Yes (use request form) |
| Tools: all pages • list • Power Tools • Broken tools {{}} | |
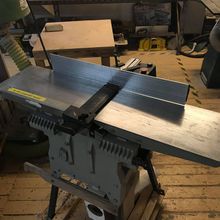
The Space has an ELU EPT 1161 Planer Thicknesser, on long term loan from Jelly, it is located in the Dusty Area.
Status March 2023
Currently only the planner functionality is working due to a problem in the gearbox, as parts are not obtainable likey the unit will be replaced when suitable unit can be sourced, meanwhile the yellow box stand alone Thicknesser is available in the same area for the same functionality.
Inductions
The Planer-Thicknesser is an induction tool, and an Induction can be requested via this form
The induction process can be as short as 10-15 minutes for an experienced user or as long as you feel necessary to be comfortable using the machine if you're just starting out.
Currently access to the machine is limited by a physical lockout and combination padlock, which will in the fullness of time be replaced with an RFID system.
What It Does
The Planer-Thicknesser, carries out it's eponymous operations of Planing and Thicknessing Solid Wood.
This allows a rough hunk of timber, to become a pristine board for joinery & cabinetry, picture framing, luthiery or just looking at, I guess.
The machine also enjoys an occasional coat of beeswax being rubbed on it's tables, you should do this in much the same way as you'd rub the belly of a friendly cat. That is: remembering it still has sharp bits, even if they're not in active use.
Planing
Taking a rough and/or not flat surface, and producing a smooth, flat one.
This is the first operation, in making your board.
Facing
Initially, one of the wider surfaces is planed flat, if you have a piece of timber which is bowed (bent along its length) or cupped (bent across it's width) the face which will have points of contact at both ends/sides should be used for this first face.
The Timber should be run across the cutters using the outfeed table as a reference surface, by repeatedly taking gentle passes in this way until no roughness, cupping or bowing remains, a face can be established on the timber.
Edge
to get a straight, perpendicular edge (or other angled edge, as the fence can accommodate anything from 45°-90°) the timber is then run across the cutters with the initial face referenced against the fence, and allowed to sit on the tables and cutter block under it's own weight, applying minimal downward pressure.
Thicknessing
This is the second, less involved function, and will use the face and edge defined by planing to produce an accurately-sized board with perfect parallelism.
The face and edge defined earlier are placed on the bottom, thicknessing table and allowed to engage with the power feed rollers, which pass the board under the cutter block, to create a second, parallel face and edge.
When attempting to use the thicknessing function to define the second edges of thin boards, give due consideration to how stable they may be resting on a thin face, running several through next to each other for stability may be the wisest course of action, and in some cases it may be neccessary to use the original planed face to edge both sides on the planer, rather than using the thicknessing function.
What it Does Not
- Pallet wood ( The yellow Thicknesser can be used with pallet wood )
- Due to grit and undetected nails causing damage, expense and lengthy down time in the past, use of the planer thickneser for processing reclaimed pallets is not allowed.
- Work with manufactured panel products, not limited to but including:
- Plywood
- MDF
- OSB
- Formica/Melamine
- Work with plastics.
- Like to find metal objects embedded within the wood it's planing.
- Like force being applied to the infeed, outfeed or thicknessing tables.
- Like removing hard surface coatings like paint or varnish.
- Enjoy beverages, hot or cold. You should never give it a beverage, not even just to hold.
It is important to respect the machine's dislikes. Failing to do so will result in it becoming unhappy and intentionally dulling or chipping its knives whilst no-one is looking; to prevent future hackers from getting a good surface finish on their work when using it.
Issues
Currently, due to space there are some issues.
Extraction
The planer connects to the blast gate manifold on the base of the central dust extractor. Simply push the free end of the hose onto the homemade box that fits beneath the planer. Currently we do not have a collecting shroud for when the machine is used as a thicknesser. The blast gate manifold is also connected to a floor scoop that can be used when finally sweeping up. Please remember to return the blast gates to Table saw on others off when job done.
In general, failing to use the chip extractor will result in more shavings than you can shake a silky-smooth recently planed stick at, and these will be ejected to a bunch of different places, just alllll over, you know... As such, however much it might seem like hassle to setup the extraction for a tiny job, it will be easier than sweeping up.
Working Space
Please position the machine centrally next to the large dust extractor so that the extraction box is towards the back of the dusty area. It shares this space with the router table. When the router table is in use the planer thicknesser is stored in the corner next to the small belt/disc sander.
The Future
The current loaned machine is hopefully a stop-gap or possibly gateway machine, towards the renovation and installation of a more substantial machine, there is one which could be available to the space once restored suitably which would eclipse the current one (both in terms of capabilities and being lined up with a strong light source).
Power
