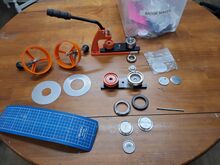
E-badges Micro Badge Making Machine
| E-badges Micro Badge Making Machine | |
|---|---|
 | |
| Manufacturer | e-badges |
| Model | Micro |
| Obtained | Pledge drive (2015) |
| Location | Craft Room |
| Team | Tools |
| Induction Required | No |
| Tools: all pages • list • Power Tools • Broken tools {{}} | |
The badge maker kit is kept in a large plastic box in the Craft_Room and contains dies and cutters for 25mm and 45mm badges. A pledge drive Badgemaker_pledge helped to raise funds for its purchase.
The dies can also be used to make keyrings, hand mirrors and medals with suitable supplies. These and further badge consumables can be obtained from [1]
Preparing Artwork
The artwork needs to be a circle larger than the finished badge as some wraps round the edges
25mm badge: 35mm artwork
45mm badge: 56mm artwork
Hint: If making many badges, staggering alternate lines allows more to be fitted on the page.
Print on ordinary 80 to 110 gsm paper. Avoid photo or glossy paper as it may cause jams if too thick.
The kit contains a circular cutter for each size. Alternatively, the Silhouette_Cameo has a print and cut function.
WARNING: Sharp blade exposed inside the circular cutters
Put the artwork on top of a cutting mat. (One is in the box)
Put appropriate metal ring over the artwork, positioned so the image is in the correct the place.
Put the matching cutter over the ring, then while holding it in place, press down the handle and rotate a full turn.
You should then have a cleanly cut circle.
Making the badge
There is a two stage process. See this YouTube video [2].
Firstly, the artwork is attached to the badge front. Be careful to only put a single circle of plastic into the press, to avoid a jam.
Secondly, the front is attached to the badge back.
Note that the larger die can make products that are thicker than a regular badge. When using this die to make regular badges, include the spacer (shown at bottom of the picture) inside the die, underneath the other components.
Hint: In the second stage when attaching the front to the back, check that the design is correctly aligned with the direction of the pin. You can look under the top hat to see the design.