Pantograph Engraving Machine: Difference between revisions
Create tool page |
Instructions for adjusting the engraver scale |
||
| (16 intermediate revisions by 4 users not shown) | |||
| Line 1: | Line 1: | ||
{{stub}} | |||
{{Tool | {{Tool | ||
|image=File:Engrave1.jpg | |image=File:Engrave1.jpg | ||
|manufacturer=Rank-Taylor-Hobson | |manufacturer=Rank-Taylor-Hobson | ||
|model=Model D | |model=Model D | ||
|obtained=Pledge Drive | |obtained=[[Engraving Machine Pledge|Pledge Drive]] | ||
|obtaineddate=01/02/2019 | |||
|location=Metalworking Area | |||
|location=Metalworking | |||
|team=Metalworking | |team=Metalworking | ||
|induction=No | |induction=No | ||
}} | }} | ||
==Images== | |||
<gallery> | |||
File:Engrave1.jpg|Engraving Machine Front View | |||
File:S-l1600 (2).jpg|Picture of Existing Gravograph Templates | |||
File:S-l1600 (1).jpg|Side View. Note for scale, the machine stands about 4 feet tall | |||
</gallery> | |||
==Manual== | |||
The manual can be found here: [[Media:Taylor_Hobson_Engraver_manual.pdf]] | |||
==Scale Adjustment== | |||
The scale must be adjusted at 3 points. They must all be on the same number, or the engraving will come out slanted. The diagram below indicates the 3 points. | |||
[[File:Engraver adjustment.png|thumb]] | |||
==Cutter Grinder== | |||
There is a cutter grinder that goes with this machine, that grinds the D bit cutters to the special form required. Do not use this grinder for anything else not stated in the user manual. Damage to you or the machine will occur, especially if you are caught. The manual for the cutter grinder is here: [[Media:Engraver_cutter_grinder_manual.pdf]] | |||
==Letter Templates== | |||
The letter templates are stored in the grey drawer under the bench between the Engraver and the mini mill, labelled "Engraver Letters" | |||
==Power== | |||
[[File:Pantograph Rating Plate.jpeg|thumb|left|200px|Rating Plate]] | |||
Fed from a 16amp 3 Phase supply | |||
The Pantograph Engraving Machine shares a 3 phase socket with the [[Bridgeport Mill]]. | |||
It is located on the ceiling. The Bridgeport Mill should be plugged in by default. | |||
<br clear=all> | |||
Latest revision as of 14:55, 23 November 2024
| This page is a stub. You can help by expanding it! This page is included in the list of stub pages. |
| Pantograph Engraving Machine | |
|---|---|
 | |
| Manufacturer | Rank-Taylor-Hobson |
| Model | Model D |
| Obtained | Pledge Drive (01/02/2019) |
| Location | Metalworking Area |
| Team | Metalworking |
| Induction Required | No |
| Tools: all pages • list • Power Tools • Broken tools {{}} | |
Images
-
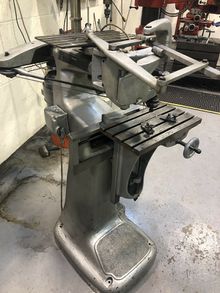
Engraving Machine Front View
-
Picture of Existing Gravograph Templates
-
Side View. Note for scale, the machine stands about 4 feet tall
Manual
The manual can be found here: Media:Taylor_Hobson_Engraver_manual.pdf
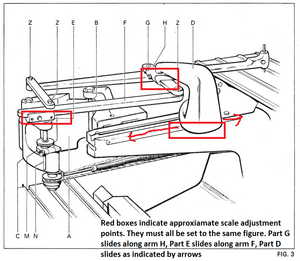
Scale Adjustment
The scale must be adjusted at 3 points. They must all be on the same number, or the engraving will come out slanted. The diagram below indicates the 3 points.

Cutter Grinder
There is a cutter grinder that goes with this machine, that grinds the D bit cutters to the special form required. Do not use this grinder for anything else not stated in the user manual. Damage to you or the machine will occur, especially if you are caught. The manual for the cutter grinder is here: Media:Engraver_cutter_grinder_manual.pdf
Letter Templates
The letter templates are stored in the grey drawer under the bench between the Engraver and the mini mill, labelled "Engraver Letters"
Power

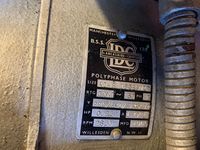
Fed from a 16amp 3 Phase supply
The Pantograph Engraving Machine shares a 3 phase socket with the Bridgeport Mill.
It is located on the ceiling. The Bridgeport Mill should be plugged in by default.


